Advertisement


mr-pimpen
-
Posts
1,299 -
Joined
-
Last visited
-
Days Won
82
Content Type
Profiles
Forums
Downloads
Bugs
Roadmap
Suggestions
WebFlake Changelog
FAQ
Store
Blogs
Applications
Ideas
Everything posted by mr-pimpen
-
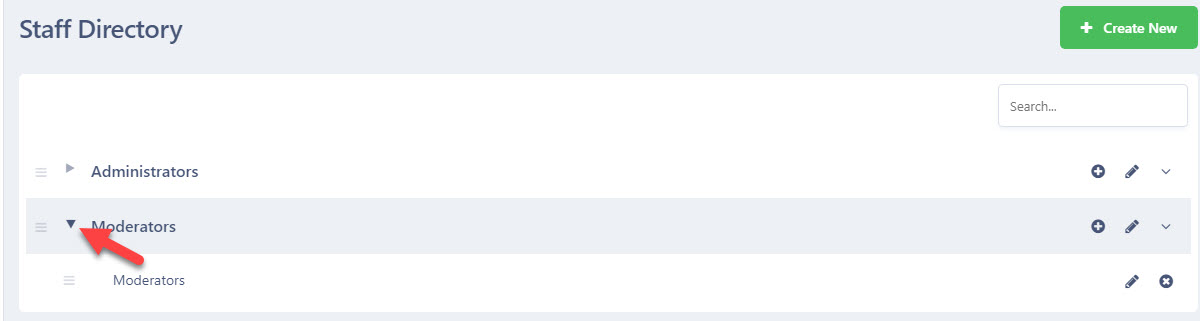
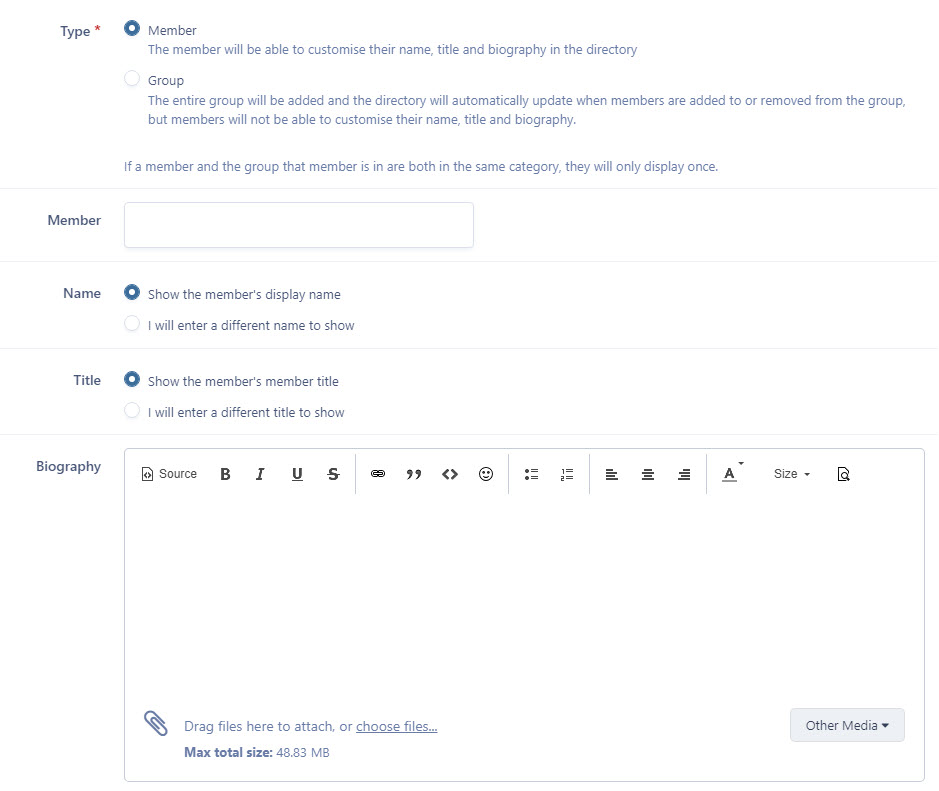
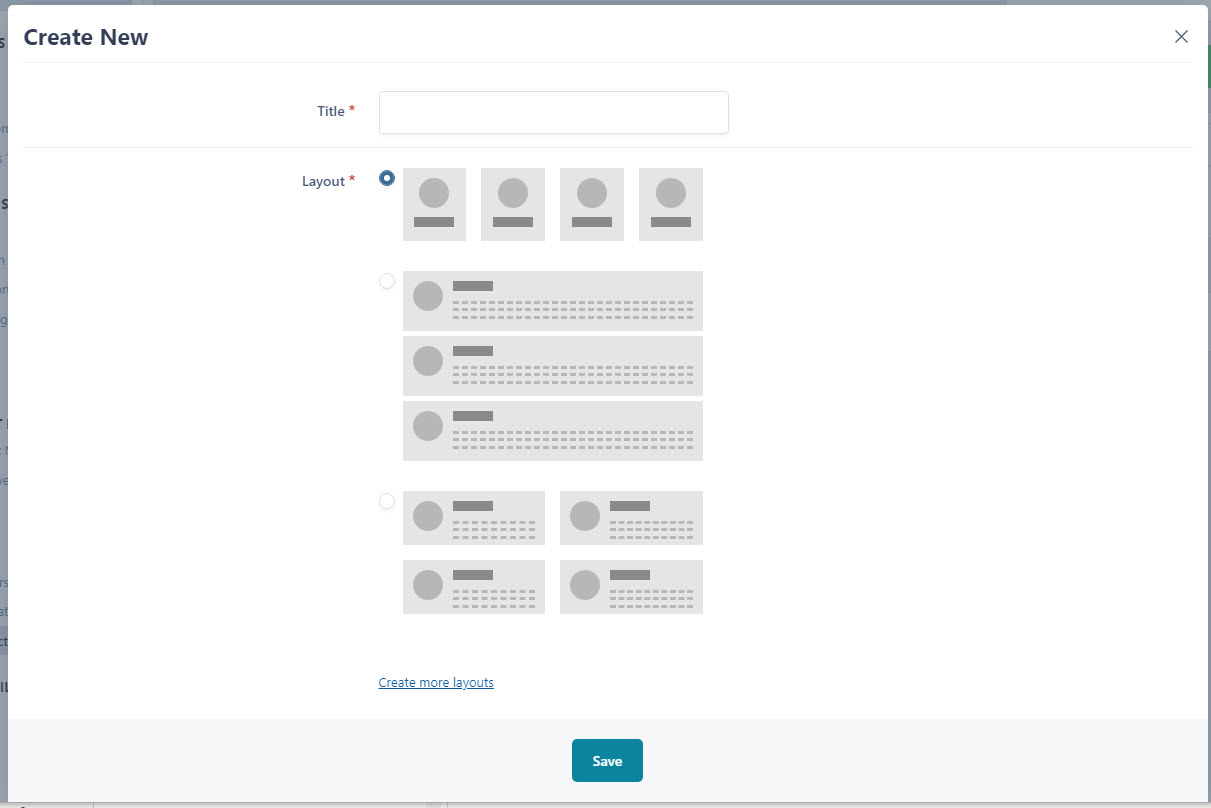
This Is A Guide For Adding A Staff Member With Out A Addon Creating a staff directory for you community can be useful for all sorts of reason. Maybe just so that your members can see the staff just at a glance, or maybe you run a gaming community where the Staff may actually be staff within your game. Whatever the reason, you can create a staff directory with ease in the IPS4 Admin CP. Creating a Directory To add a staff directory, visit Members>Staff>Staff Directory, from within your admin CP. By default you will first see this (if you expand the 2 groups) with the administrator and moderators groups already added. You can add either groups or individual members to a category within this page by clicking on the plus icon at the side of any group. To add a new category click on Create Category. Once you have clicked the plus to add a member or group to a category. You will be presented with one of 2 sets of information to enter. If it is a group then you would simply select the group. If a member then there are also other items you can select here You will note that you can change what you display for the member if you are entering an individual into the staff directory. This is handy if for example you wish to show someones real name or something different. So I may have a member called X2201 and want to show them as Dave (X2201) so its clear who the person is. This is the same with the user title, so they may have "Happy Guy" where I may want to put "Clan Leader" for example. Directory Display You can change the way in which the directory is displayed my changing the display of each category. You can change these by selecting the pencil icon at the right of any category in the list. Once selected you will be shown a screen similar to the below. You can choose from any of the layouts provided, and can even create more layouts if you are a more advanced user. Using these options you can create some great layouts Advanced Layout Usage It is possible to create custom layouts for the Staff Directory page. You will need to write the templates using HTML, so to do this you will need to be familiar with HTML, as well as basic PHP logic. In the AdminCP, go to Customization -> Themes and click the "Edit HTML and CSS" button for your default theme. Then, from the "New" dropdown, choose "HTML Template". You can name the template whatever you like, and fill the rest of the form out with the following details: Variables: $users Location: Add to an existing location Existing Location: front Group: Add to an existing group Existing Group: staffdirectory Application: System You will then need to navigate to your newly created template within the many on the left (it will be under core -> front -> staffdirectory) and here is where you write the HTML code for your template. The template will be passed a $users variable which is an array of \IPS\core\StaffDirectory\User objects. Your code can include template logic and template tags You can use one of the existing templates as an example. After this you will also need to create another template with the same name (and settings above) but with "_preview" appended to the name (for example, if the template you just created is called "myCustomLayout" the template you create now will be "myCustomLayout_preview") which contains the HTML to display on the form when creating a Staff Directory group in the AdminCP. Since you know what the layout will look like, you can make this quite simple. You will need to repeat these steps for every theme you have installed (except child themes which will inherit the templates of their parents). Once this is done, when creating a Staff Directory group, you will see the template you have created as one of the available options.

-
Version 1.0.0
2 downloads
Latest version of the dutch translation for XenForo 2.1 This version is based on previous translations, mainly the 1.5 translation (with permission of the author). Since then, I have added, reviewed and streamlined hundreds of phrases based on feedback from my own forum. My goal is to make a solid translation and keep it up to date. You can expect regular updates of this translation! Managing languages (recommended) If you want to use this language, but also want to keep your own customized phrases, I highly recommend to use the follow steps. It is basically the same approach as the template system: This way you can frequently update the language pack 'Nederlands - origineel' while keeping your own customizations in your own language pack called 'Nederlands'. To prevent your users from selecting 'Nederlands - origineel' you will need to install a small add-on. Instructions: Install this add-on to hide certain language packs from your users: [XenDACH] LimitLanguageUsage Import the dutch language pack as a new language called 'Nederlands - origineel' Create a new language pack called 'Nederlands' and make sure to use the exact same settings as 'Nederlands - origineel' Make 'Nederlands' child of 'Nederlands - origineel' Now, you can disable 'Nederlands - origineel' (that's why you installed the add-on). This prevents users from selecting this language. They will only see your customized version called 'Nederlands' -
you have to look around the next to find what ya like thats just a some up of what and how to do it you can try giffy website and upload it to your server
-

Getting a Fontsawesome Icon beside a group name
mr-pimpen replied to P1RATE's question in Invision Support Archives
<i class="fa fa-shield -
you to happy thanksgiving
-
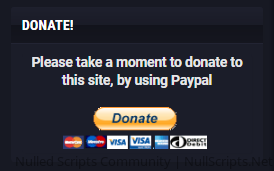
PayPal Business or Premier account at paypal How to do it: Go to your admin panel: Appearance > Widgets > add a Widget. Widget definition : HTML Widget key: Donate_by_Dan Title: Donate! Forums list: Forum list: Sidebar Positioning: You can choose where you want it to sit. Now log into your Paypal account (Must have a PayPal Business or Premier account at paypal) Log in to your PayPal Business or Premier account at paypal. Once Your PayPal account Summary page opens. At the top of the page, select Tools, and then All Tools. Scroll to the PayPal buttons tile and click Open. Select the type of button you want to create. The Create PayPal payment button page opens and displays the button's configuration options. Under 'Template:' copy and paste this: <!--Début : Donate_by_Dan --> <div class="block-container" style="text-align:center;"> <b>Please take a moment to donate to this site, by using Paypal</b><br><br> PAYPAL CODE HERE </div> <!--Fin : Donate_by_Dan--> Then when you've made the donate button how you want it to be, copy and paste the html code from Paypal to where it says 'PAYPAL CODE HERE' (you can delete this)
-
if i think what you want this is the css tutorial add to css /* Primary Menu */ .ipsNavBar_primary > ul > li > a:before, .ipsNavBar_secondary > li > a:before{ content: "\f00b"; font-family: "FontAwesome"; font-size: 10px; font-weight: normal; display: inline-block; -webkit-font-smoothing: antialiased; -moz-osx-font-smoothing: grayscale; margin-bottom: -2px; margin-right: 3px; opacity: 0.6; line-height: 1; } /* The User menu and Create */ #elUserLink_menu a:before, #elCreateNew_menu a:before{ content: "\f02b"; font-family: "FontAwesome"; font-size: 14px; font-weight: normal; display: inline-block; -webkit-font-smoothing: antialiased; -moz-osx-font-smoothing: grayscale; margin-bottom: -2px; line-height: 1; } #elUserLink_menu a[href*="admin"] i{ display: none; } #elUserLink_menu a:before, #elCreateNew_menu a:before{ display: inline-block; width: 22px; opacity: 0.7; } #elUserLink_menu a:hover:before, #elCreateNew_menu a:hover:before{ opacity: 1; } /* Add Icon on the primary navigation bar */ .ipsNavBar_primary > ul > li[data-FontAwesome='Browse'] > a:before{ content: "\f005" } .ipsNavBar_primary > ul > li[data-FontAwesome='club'] > a:before{ content: "\f1b3" } .ipsNavBar_primary > ul > li[data-FontAwesome='Support'] > a:before{ content: "\f1cd" } .ipsNavBar_primary > ul > li[data-FontAwesome='Forums'] > a:before{ content: "\f086" } .ipsNavBar_primary > ul > li[data-FontAwesome='Gallery'] > a:before{ content: "\f030" } .ipsNavBar_primary > ul > li[data-FontAwesome='Downloads'] > a:before{ content: "\f019" } .ipsNavBar_primary > ul > li[data-FontAwesome='Articles'] > a:before{ content: "\f15c" } .ipsNavBar_primary > ul > li[data-FontAwesome='Blogs'] > a:before{ content: "\f02d" } .ipsNavBar_primary > ul > li[data-FontAwesome='Calendar'] > a:before{ content: "\f073" } .ipsNavBar_primary > ul > li[data-FontAwesome='Chat'] > a:before{ content: "\f27a" } .ipsNavBar_primary > ul > li[data-FontAwesome='Staff'] > a:before{ content: "\f007" } .ipsNavBar_primary > ul > li[data-FontAwesome='Users Online'] > a:before{ content: "\f0c0" } .ipsNavBar_primary > ul > li[data-FontAwesome='Activity'] > a:before{ content: "\f0ac" } .ipsNavBar_primary > ul > li[data-FontAwesome='Search'] > a:before{ content: "\f002" } .ipsNavBar_primary > ul > li[data-FontAwesome='Guidelines'] > a:before{ content: "\f0e3" } .ipsNavBar_primary > ul > li[data-FontAwesome='Tutorials'] > a:before{ content: "\f19d" } /* Add Icon on the secondary navigation bar */ .ipsNavBar_secondary > li[data-FontAwesome='Browse'] > a:before{ content: "\f00b" } .ipsNavBar_secondary > li[data-FontAwesome='club'] > a:before{ content: "\f1b3" } .ipsNavBar_secondary > li[data-FontAwesome='Support'] > a:before{ content: "\f1cd" } .ipsNavBar_secondary > li[data-FontAwesome='Forums'] > a:before{ content: "\f086" } .ipsNavBar_secondary > li[data-FontAwesome='Gallery'] > a:before{ content: "\f030" } .ipsNavBar_secondary > li[data-FontAwesome='Downloads'] > a:before{ content: "\f019" } .ipsNavBar_secondary > li[data-FontAwesome='Articles'] > a:before{ content: "\f15c" } .ipsNavBar_secondary > li[data-FontAwesome='Blogs'] > a:before{ content: "\f02d" } .ipsNavBar_secondary > li[data-FontAwesome='Calendar'] > a:before{ content: "\f073" } .ipsNavBar_secondary > li[data-FontAwesome='Chat'] > a:before{ content: "\f27a" } .ipsNavBar_secondary > li[data-FontAwesome='Online Users'] > a:before{ content: "\f0c0" } .ipsNavBar_secondary > li[data-FontAwesome='Activity'] > a:before{ content: "\f0ac" } .ipsNavBar_secondary > li[data-FontAwesome='Search'] > a:before{ content: "\f002" } .ipsNavBar_secondary > li[data-FontAwesome='Todays Activities'] > a:before{ content: "\f06e" } .ipsNavBar_secondary > li[data-FontAwesome='My Searches'] > a:before{ content: "\f00e" } .ipsNavBar_secondary > li[data-FontAwesome='Unread Content'] > a:before{ content: "\f111" } .ipsNavBar_secondary > li[data-FontAwesome='My Created Content'] > a:before{ content: "\f005" } .ipsNavBar_secondary > li[data-FontAwesome='Guidelines'] > a:before{ content: "\f0e3" } .ipsNavBar_secondary > li[data-FontAwesome='Tutorials'] > a:before{ content: "\f19d" } .ipsNavBar_secondary > li[data-FontAwesome='Staff'] > a:before{ content: "\f132" } /* Add Icon on the user bar */ /* Profile */ #elUserLink_menu > li[data-menuItem='profile'] > a:before{ content: "\f007" } /* Attachments */ #elUserLink_menu > li[data-menuItem='attachments'] > a:before{ content: "\f0c6" } /* Followed Content */ #elUserLink_menu > li[data-menuItem='manageFollowed'] > a:before{ content: "\f1d8" } /* Administrator Panel */ #elUserLink_menu > li[data-menuItem='content'] > a:before{ content: "\f03a" } /* Account Configurations */ #elUserLink_menu > li[data-menuItem='settings'] > a:before{ content: "\f013" } /* Mod Panel */ #elUserLink_menu > li[data-menuItem='modcp'] > a:before{ content: "\f132" } /* Admin Panel */ #elUserLink_menu > li[data-menuItem='admincp'] > a:before{ content: "\f023" } /* Logout */ #elUserLink_menu > li[data-menuItem='signout'] > a:before{ content: "\f08b" } /* Clients */ #elUserLink_menu a[href*="/clients/"]:before{ content: "\f07a" } /* Edit */ #elUserLink_menu > li[data-menuItem='edit'] > a:before{ content: "\f040" } /* Ignored Users */ #elUserLink_menu > li[data-menuItem='ignoredUsers'] > a:before{ content: "\f235" } /* Options */ #elUserLink_menu > li[data-menuItem='options'] > a:before{ content: "\f0ac" } /* Messages */ #elUserLink_menu > li[data-menuItem='messages'] > a:before{ content: "\f01c" } /* Add Icon on create bar */ /* Default icon that is displayed if you do not add */ #elCreateNew_menu a:before{ content: "\f0fe" } /* Announcement */ #elCreateNew_menu a[href*="/announcements/"]:before{ content: "\f0a1" } add to navbar items <li {{if $item->active()}}class='ipsNavBar_active' data-active{{endif}} id='elNavSecondary_{$item->id}' data-role="navBarItem" data-navApp="{expression="mb_substr( get_class( $item ), 4, mb_strpos( get_class( $item ), '\\', 4 ) - 4 )"}" data-navExt="{expression="mb_substr( get_class( $item ), mb_strrpos( get_class( $item ), '\\' ) + 1 )"}" data-FontAwesome="{$item->title()}">
-
show an image where you are try to put the icons at
-
do you even kno how 2 do it even if its generated it should work something you are doing wrong
-
IPS 4.6 My Users get a "Banned" message even though they are not banned.
mr-pimpen replied to leakslauncher's question in IC4 Support
you do have ip address ban filters you have to set that up Ban Settings!!! you can check your spam logs in the spam section check all that applies to you -
some members might not be interested in this topic who know
-
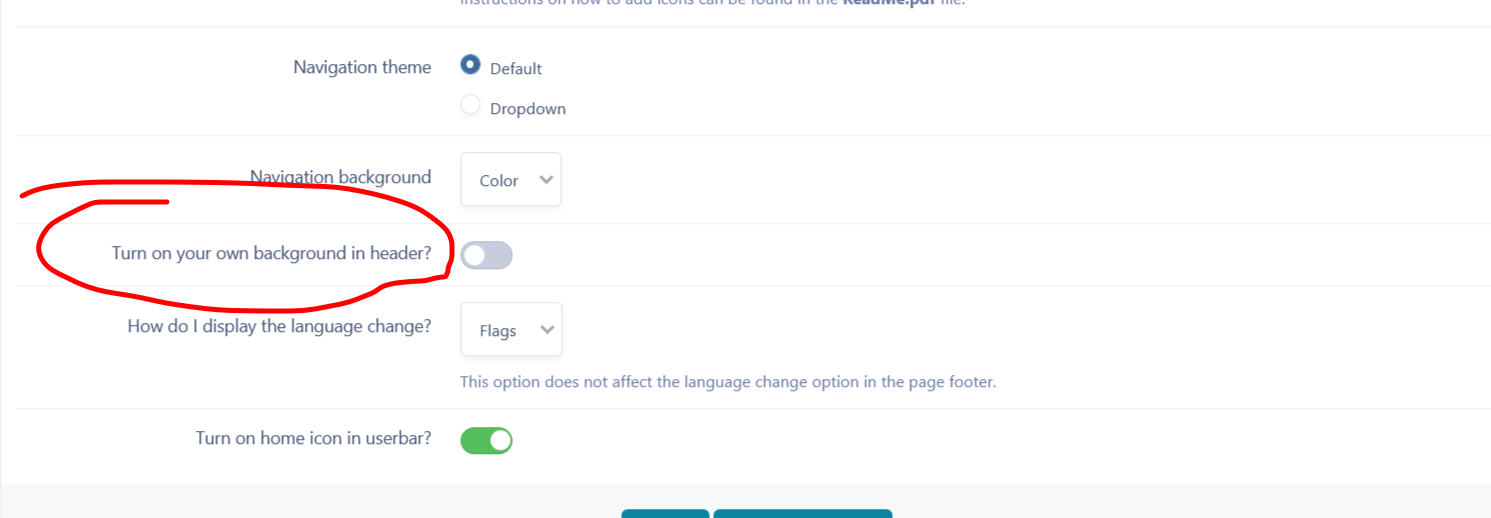
did you look in ya theme setting if you are trying to add your on header it should be there Turn on your own background in header?
-
this will work you have to upload to your server for it to work <span style='color: #9572ff; background: url(Image/sparkle_purple.gif); font-weight: bold;'>
-
you can do this with in the theme
-
what are u trying to do
-
i would try and use a diffrent theme and not the one you are using try that i think that theme is giving issue with i have tested that them there might be some bugs in it
-
check all you plugins and application one of them could be doing that
-
i dont kno why you are having these issues with all your forums it could be some coding issue or a plugin i never ran in to that issue!!!!
-
try changing ya setting Login & Registration to Yes, with full registration form
-
have u done any codeing or add a new plugin
-
try changing the settings
-
witch one do you have it set on mine is this one
-
try changing the theme see if that help and all you sitting are set
-
you can all so try this from ipsfucus Header background image
-
did you change anything Groups permission over look it again and see whet going on


.png.700e4d241f21bd8b2bb32235d10e4213.png)