Advertisement


Shu
-
Posts
93 -
Joined
-
Last visited
-
Days Won
5
Content Type
Profiles
Forums
Downloads
Bugs
Roadmap
Suggestions
WebFlake Changelog
FAQ
Store
Blogs
Applications
Ideas
Everything posted by Shu
-
Hi, Today I share a tutorial under xenForo 2.0 : Create a usergroup legend in sidebar ! Create a new template named usergroup_legend : <div class="block"{{ widget_data($widget) }}> <div class="block-container"> <h3 class="block-minorHeader"><i class="fa fa-user" style="padding-right: 3px;"></i>Usergroup</h3> <div class="block-body block-row"> <dl class="pairs pairs--justified"> <div class="username" style="text-align:center;"> <span class="username--style3">Administrator</span> <span class="username--style4">Modérator</span> <br><span class="username--style6">Administrator</span> <span class="username--style12">Modérator</span> <br><span class="username--style18">Administrator</span> <span class="username--style10">Modérator</span> <br><span class="username--style9">Administrator</span> <span class="username--style13">Modérator</span> <br><span class="username--style2">Administrator</span> </div> </dl> </div> </div> </div> In your template PAGE_CONTAINER find : <xf:ad position="container_sidebar_below" /> Add this below : <xf:include template="usergroup_legend" /> Screen :
-
- without code - - with code - As you can see the download button is always on the right side. To achieve this add this code to your extra.less template: /*** Download button always on right side ***/ @media (min-width: @xf-responsiveMedium) { [data-template="xfrm_resource_view"] .p-title { flex-wrap: initial !important; } } /**********/
-
Add code to your extra.less template: /* Coloured Node Categories */ .block.block--category.block--categoryX .block-header { background: #009ACF; color: #ffffff; } /**********/ Change X to your node ID. How do I find node ID? It's simple to find it. Just hover on your Node Category Title like in example below and check for the ID: So the code for example above will be: .block.block--category.block--category21 .block-header { background: #7CA430; color: #ffffff; } For each node ID you need to copy/paste the code above, then just edit to suit your needs.

-
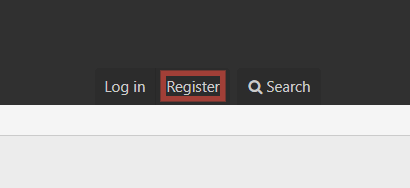
Add code to your extra.less template: /* Icons for Login and Register buttons */ .p-navgroup-link.p-navgroup-link--textual.p-navgroup-link--logIn:before { font-family: FontAwesome; content: "\f090"; color: #E6BB5C; padding-right: 5px; } .p-navgroup-link.p-navgroup-link--textual.p-navgroup-link--register:before { font-family: FontAwesome; content: "\f084"; color: #E6BB5C; padding-right: 5px; } /**********/
-
Add code to your extra.less template: /* Hide user extra info */ .message-userExtras { opacity: 0; max-height: 0px; overflow: hidden; transition: all 0.5s ease-in-out; } .message-cell.message-cell--user:hover .message-userExtras { opacity: 1; max-height: 300px; } /**********/
-
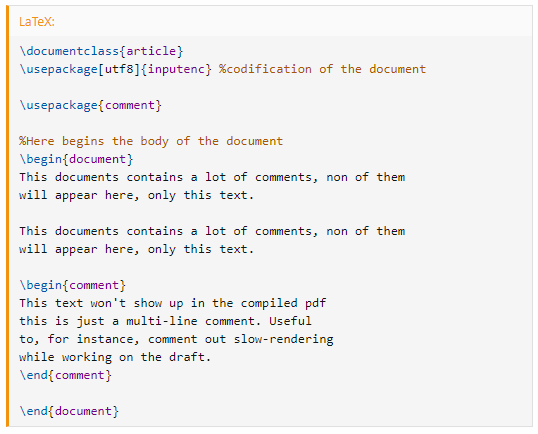
Since xenForo 2.0.1 release you can add additional language support on your forum. There was no way to do so before due to this bug. This method of adding additional language was proposed by @Chris D. In this example, I will be adding LaTeX support. 1. Downloading PrismJS components xenForo uses PrismJS library for highlighting code in blocks. Not all languages are included in PrismJS that goes with xenForo by default. So you will have to add additional languages directly. Go to PrismJS components page. There are a lot of files. You need to find the file with the name of the language you want support on your forum. In this example we need to download prism-latex.min.js. Note that there are two files with almost the same name on that page: prism-latex.js prism-latex.min.js We are downloading the minified .min version of this file. It is compressed and will load faster. 2. Locating downloaded files In your forum root folder go to js folder and create a prism_additional directory. Move your downloaded file (prism-latex.min.js in my example) to created folder. 3. Registering additional language in xenForo Go to Admin CP -> Settings -> Options and select "Messages" option page. (admin.php?options/groups/messageOptions/) Add the name of added language to "Allowed code BB code block languages" list (latex in this example). Now go to prism_macros template and add this code (don't forge to replace latex with your language name): <xf:js src="prism_additional/prism-latex.min.js" /> right after: <xf:js prod="xf/code_block-compiled.js" dev="vendor/prism/prism.min.js, xf/code_block.js" /> The final code should look like that: <xf:macro name="setup"> <xf:css src="bb_code.less" /> <xf:js prod="xf/code_block-compiled.js" dev="vendor/prism/prism.min.js, xf/code_block.js" /> <xf:js src="prism_additional/prism-latex.min.js" /> </xf:macro> Now go to Appearence -> Phrases and add new code_language.latex phrase. In "Phrase text" type the name of the language ("LaTeX" in this example). That's all! You can insert code blocks with LaTeX code and they will be correctly highlighted: Adding language to "Common languages" If you want to add custom language to "Common languages" option group go to editor_dialog_code template and find this code: <xf:optgroup label="{{ phrase('common_languages') }}"> <xf:foreach loop="$languages" key="$key" value="$language"> <xf:if is="$language.common"> <xf:option value="{$key}">{$language.phrase}</xf:option> </xf:if> </xf:foreach> </xf:optgroup> Paste new option <xf:option value="latex">{{ phrase('code_language.latex') }}</xf:option> between <xf:optgroup... and <xf:foreach... lines so the code will look like: <xf:optgroup label="{{ phrase('common_languages') }}"> <xf:option value="latex">{{ phrase('code_language.latex') }}</xf:option> <xf:foreach loop="$languages" key="$key" value="$language"> <xf:if is="$language.common"> <xf:option value="{$key}">{$language.phrase}</xf:option> </xf:if> </xf:foreach> </xf:optgroup> You can now choose added additional language from "Common languages" option group. Setting the default language option when adding code xenForo choses "General code" option by default. You want to change this behaviour and set a different language as a default option. Go to editor_dialog_code template. If you added additional language in "Common languages" option group simpy add selected="true" attribute to additional language option: <xf:option value="latex" selected="true">{{ phrase('code_language.latex') }}</xf:option> If there is no direct <xf:option with needed language name in the template you will have to modify <xf:foreach... loop a bit. Replace this block: <xf:optgroup label="{{ phrase('other_languages') }}"> <xf:foreach loop="$languages" key="$key" value="$language"> <xf:option value="{$key}">{$language.phrase}</xf:option> </xf:foreach> </xf:optgroup> With this code: <xf:optgroup label="{{ phrase('other_languages') }}"> <xf:foreach loop="$languages" key="$key" value="$language"> <xf:if is="$key == 'latex'"> <xf:option value="latex" selected="true">{$language.phrase}</xf:option> <xf:else /> <xf:option value="{$key}">{$language.phrase}</xf:option> </xf:if> </xf:foreach> </xf:optgroup> Don't forget to replace latex with the name of your language.
-
Shorter XF2 CLI Syntax This adds a shortened CLI Syntax. For example instead of php cmd.php xf:addon-install Foo/Bar you only need xf xf:addon-install Foo/Bar GitHub: Linux/MacOS: https://github.com/jakebooher/xf-cli Windows: https://github.com/jakebooher/xf-cli-win Can be installed via Homebrew on MacOS thanks to @DragonByte Tech with brew install belazor/tools/xf-cli I've been using it pretty consistently, doesn't do a whole lot but it's convenient If you want to install it without homebrew just add the directory containing the shell script into your $PATH and ensure it has execute permissions
-
Version 4390633
25 downloads
Almost 120 pages of temporary mail hosts to get rid off Navigate to the Banned emails page. Admin Control Panel → Users → User discipline → Banned emails Click on the Import button and select the MailChecker.xml file that is included in the zip archive. This list is derived from the MIT-licensed mailchecker by FGRibreau. -
Considering there's less than a month left for it to expire. Are you willing to still sell it?
-

How to recover missing icons in the AdminCP menu?
Shu replied to Veka Mcp's question in Invision Support Archives
For me, it worked when I updated my path to installation which was not home/<myusername>/public_html but home2/<myusername>public_html I use cpanel on my VPS, your path may be different You might also want to check your .htaccess -
Since we found it a bit of a ridiculous area of contention over the years, we decided to put to bed the issue of branding removal once and for all. To us, it makes more sense that YOU get the choice in supporting us or not. Being forced to is not the way it should be done just to squeeze a few dollars. It was just the standard that we saw other designers doing and never really questioned it. But our customers mentioned it, and we listened. We'd far rather you be proud to display our name than be forced to. Therefore, we now offer free removal for our public branding on themes and add-ons. How to remove the branding? We keep it i by default, but its free and easy to remove. To remove it, simply go to /src/config.php and add the line $config['removeThemeHouseBranding'] = true;
-
Well, the winners in the giveaway both linked their twitter for extra points so why not? Also it's a private message on twitter and once they confirm, it'll be announced here on forum. Read first
-
Well, we are the best damn community. Congrats to the winners :x not me
-
Hi,Today I share a tutorial under xenForo 2.0 : Status indicator online or offline !In your template message_macros find : <span class="message-userArrow"></span> Add this before : <xf:if is="$user.isOnline()"> <div class="onlineON">Online</span></div> <xf:else /> <div class="offlineOFF">Offline</span></div> </xf:if> Add this in your template EXTRA.less : /*online - offline*/ .onlineON{ background: #32CD32; padding: 5px; text-align: center; border-radius: 0 0 5px 5px; margin-top: 5px; } .offlineOFF{ background: #ff0000; padding: 5px; text-align: center; border-radius: 0 0 5px 5px; margin-top: 5px; } Screen :
-
Hi Today I share a tutorial under xenForo 2.0 : Change the color of the blocks on your sidebar!! Add this in your template EXTRA.less : /*color bloc sidebar*/ .block-minorHeader { background-color: #0f3652 !important; color: #FFF !important; } Screen :
-
Hi,Today I share a tutorial for version 2.0 of xenForo : add Font Awesome icons to your usergroups!Here is the basic code to add in your EXTRA.less template : /*add fa to your usergroups*/ .username--style3:before { font-family: "FontAwesome"; content: "\f013"; color: inherit; padding-right: 4px; display: inline-block; } style3 is my usergroup Admin.If you want a rotation : .username--style3:hover:before{ display:inline-block; -webkit-transform:rotate(360deg); -moz-transform:rotate(360deg); -o-transform:rotate(360deg); -ms-transform:rotate(360deg); transform:rotate(360deg); -webkit-transform:rotate(360deg); -moz-transform:rotate(360deg); -ms-transform:rotate(360deg); -o-transform:rotate(360deg); transition:all 0.8s; -webkit-transition:all 0.8s; -moz-transition:all 0.8s; -ms-transition:all 0.8s; -o-transition:all 0.8s } Screen :
-
Hi,Today I share a tutorial under xenForo 2.0 : Add Font Awesome icons to your prefix !To begin add this in your template EXTRA.less : /*adding fa icon to prefix*/ .fa:before{ font-family:FontAwesome; margin-right:3px } Then in the prefix of your choice check other CSS class. Add this code: label label--royalBlue fa fa-graduation-cap Explication : label label--royalBlue is the color, and fa-graduation-cap to the FA icon.Screen :
-
Hi,Today I share a tutorial under xenForo 2.0 : align the titles of your blocks in the sidebar!Add this code in your template EXTRA.less : /*aligns the text of the sidebars blocks*/ .block-minorHeader { text-align:center; } Screen :
-
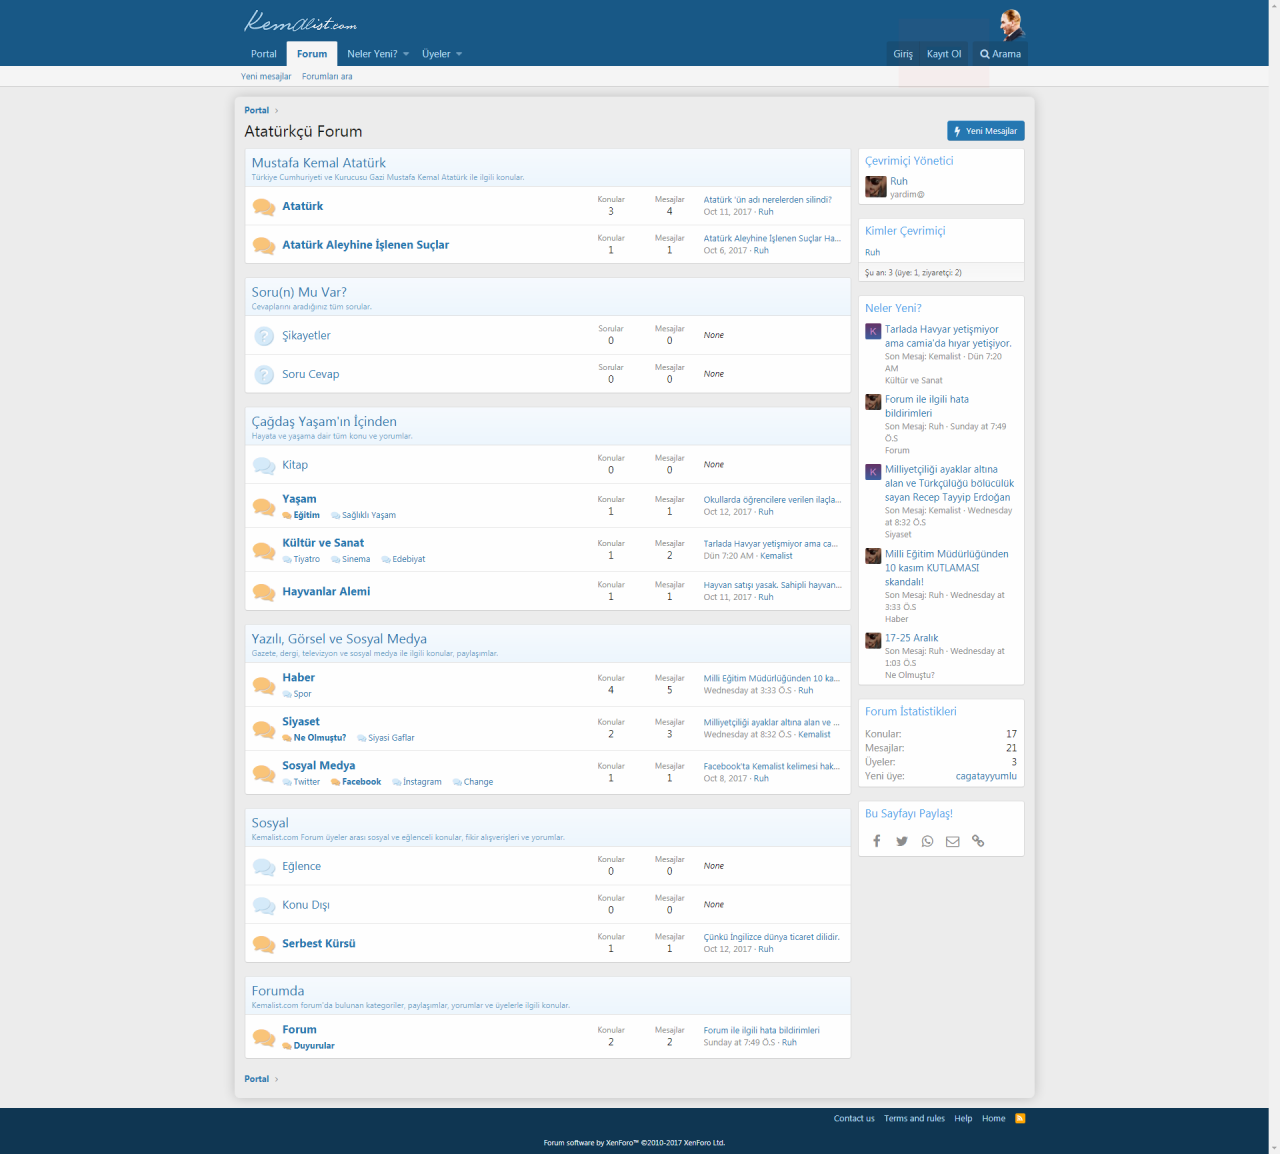
This is a short and simple guide to achieve custom staff online titles since ordinarily it shows your profile user title instead of a staff title for staff online.Go to the template widget_members_online.Find: <xf:if is="$user.is_staff"> <li class="block-row"> <div class="contentRow"> <div class="contentRow-figure"> <xf:avatar user="$user" size="xs" /> </div> <div class="contentRow-main contentRow-main--close"> <xf:username user="$user" rich="true" /> <div class="contentRow-minor"> <xf:usertitle user="$user" /> </div> </div> </div> </li> </xf:if> For Administrator, Super Moderator, and Moderator replace with: <xf:if is="$user.is_staff"> <li class="block-row"> <div class="contentRow"> <div class="contentRow-figure"> <xf:avatar user="$user" size="xs" /> </div> <div class="contentRow-main contentRow-main--close"> <xf:username user="$user" rich="true" /> <div class="contentRow-minor"> <xf:if is="{{ $user.isMemberOf(x) }}"> <div class="usertitle">Administrator</div> <xf:elseif is="{{ $user.isMemberOf(y) }}" /> <div class="usertitle">Super moderator</div> <xf:elseif is="{{ $user.isMemberOf(z) }}" /> <div class="usertitle">Moderator</div> <xf:else /> <xf:usertitle user="$user" /> </xf:if> </div> </div> </div> </li> </xf:if> You will need to replace x, y, or z inside of this with your usergroup id: To find the number of your usergroup click on the usergroup in settings from your admin panel and look in the URL. The number you see in the URL is the number of your usergroup. Then you would simply change the user title between the correct div to the appropriate title for it to appear in staff online. To do this for more than 3 usergroups you simply add another xenforo elseif statement like above and place it right after the first 3. Now when you go to view staff online the usertitle it should have now be the custom usertitle. What this template modification allows you to do: It allows you to have a staff title in staff online of your choosing without having to use the default user title given to staff. It allows you to use a custom title only visible in staff online. This is mainly used when someone doesn't want their user title to be their staff name and instead wants to use user ranks or another form of showing their staff identity. In other words your only changing the title of the staff online title. Big thanks to @DL6 for helping with the correct code.
-
Version 2.0.0
31 downloads
A template modification to separate Sticky and Normal threads. Sticky/Normal labels are phrased.Based off; Separate Sticky and Normal Threads (XF +1.2) by XonPhrases seperator_normal_threads seperator_sticky_threads Contributing features or bug fixesPlease create a Github Pull request via the "More information" link.ContibutionsIf you appreciate this addon, please consider a contribution via PayPal. Details will be provide via private conversation.Please contact me if you wish for different licencing arrangements. -
Hi friends, I am sorry that I do not speak English. This simple postbit design that I have prepared for those who want to use horizontal design instead of vertical postbit design of Xf2 is composed of css based layout. All you have to do for this is to save the following codes in the extra.less template .message-avatar { float: left } @media (min-width: 650px) { .message-userDetails { display:inline-block; padding: 10px; min-width: auto; min-height: 96px } } @media (max-width: 800px) { .message:not(.message--forceColumns) .message-userExtras { display: none; } } .message-userExtras { display: block; float: right; margin-top: -10px !important; width: 31%; background: azure; margin-right: -10px } .message-userArrow { top: 0px !important; right: 0px !important; border: 0px solid transparent !important } .message-userArrow:after { border: 0px solid transparent !important } .message-inner { display: block !important } .template-thread_view .message-cell.message-cell--user,.template-thread_view .message-cell.message-cell--action { padding: 10px; width: 100%; max-height: 150px; } .message.message--quickReply.block-topRadiusContent.block-bottomRadiusContent .message-cell.message-cell--user { display: none } .message--simple .message-cell.message-cell--user { display: none } .message-userExtras dl:nth-child(2n+1) { float: left !important; width: 49%; padding-right: 10px } .message-userExtras dl:nth-child(2n+2) { float: right; width: 49% } .template-thread_view .pairs.pairs--justified { border: 1px solid rgba(11,76,91,0.2); padding: 3px; margin: 1px } .message-avatar .avatar { border-radius: 50%; border: 3px solid #d8d8d8; } .message-cell.message-cell--user { border-right: none; }
-
add css extra.less .p-body-inner{background:#ececec; box-shadow: inset 0 0 1em #ECECEC, 0 0 2em #BEBEBE; padding-left: 15px;padding-right: 15px;border-top-left-radius: 8px;border-top-right-radius: 8px;border-bottom-left-radius: 8px;border-bottom-right-radius: 8px} .p-body{padding-top:15px;padding-bottom: 15px}
-
paste this code into the extra.lessHave funBefore After .actionBar-action--edit:before, .actionBar-action--report:before, .actionBar-action--ip:before, .actionBar-action--delete:before, .actionBar-action--spam:before, .actionBar-action--warn:before, .actionBar-action--history:before { display: inline-block; font-family: FontAwesome; font-size: inherit; text-rendering: auto; -webkit-font-smoothing: antialiased; margin-right: 5px; } .actionBar-action--edit:before { content: "\f040"; } .actionBar-action--report:before { content: "\f071"; } .actionBar-action--ip:before { content: "\f002"; } .actionBar-action--delete:before { content: "\f00d"; } .actionBar-action--spam:before { content: "\f024"; } .actionBar-action--warn:before { content: "\f12a"; } .actionBar-action--history:before { content: "\f1da"; }
-
What you achieve: Add to extra.less template: /* PULSE ANIMATION */ .pulse { position: relative; box-shadow: 0 0 0 0 rgba(232, 76, 61, 0.7); cursor: pointer; -webkit-animation: pulse 1.25s infinite cubic-bezier(0.66, 0, 0, 1); -moz-animation: pulse 1.25s infinite cubic-bezier(0.66, 0, 0, 1); -ms-animation: pulse 1.25s infinite cubic-bezier(0.66, 0, 0, 1); animation: pulse 1.25s infinite cubic-bezier(0.66, 0, 0, 1); } .pulse:hover { -webkit-animation: none;-moz-animation: none;-ms-animation: none;animation: none; } @-webkit-keyframes pulse {to {box-shadow: 0 0 0 45px rgba(232, 76, 61, 0);}} @-moz-keyframes pulse {to {box-shadow: 0 0 0 45px rgba(232, 76, 61, 0);}} @-ms-keyframes pulse {to {box-shadow: 0 0 0 45px rgba(232, 76, 61, 0);}} @keyframes pulse {to {box-shadow: 0 0 0 45px rgba(232, 76, 61, 0);}} In PAGE_CONTAINER find: <span class="p-navgroup-linkText">{{ phrase('register') }}</span> Add new class like so: <span class="p-navgroup-linkText"><span class="pulse">{{ phrase('register') }}</span></span> CSS Effect Source: https://codepen.io/wifeo/pen/KwdXwV
-