
Advertisement
Leaderboard


Popular Content
Showing content with the highest reputation on 05/16/2020 in all areas
-
Release Notes Tutorial So after following a guide from IPS located here and some people wanted to re-create it i found out i did it myself and sharing the work here to simplify things for others. If you liked this tutorial please remember to give it a thumbs up. where you see this icon bottom right corner of this post. Let's get started! Pre - Download the files from the download section below 1) Import the Database 2) Permissions for the database 3) Delete the default template that gets created 4) Upload Template file 5) Add the CSS and JS 6) Finding and adding the correct field_id 7) Editing Database Settings 8) Creating the page If you liked this tutorial please remember to give it a thumbs up. where you see this icon bottom right corner of this post.1 point
-
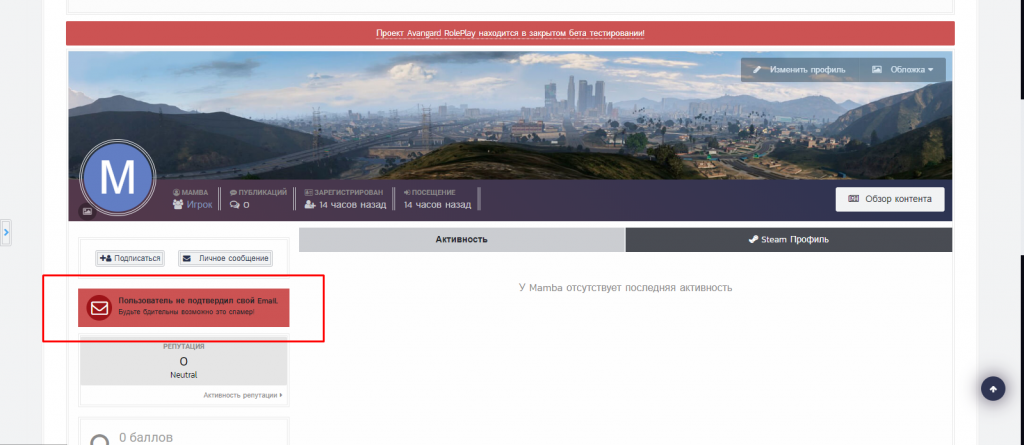
A sign in the profile indicating that the user has not confirmed his registration The tablet will appear if the user after registration has not confirmed his Email address open the list of styles HTML and CSS editing CSS tab> custom.css add to the very bottom /** Warning Email in Profile **/ .warning_Email { color: #ffffff; font-size: 26px; padding-top: 7px; padding-left: 1px; width: 40px; height: 40px; border-radius: 38px; position: relative; display: inline-block; text-align: center; background-color: #9e1419; } .WEmail_bottom { padding-top: 5px; } .WEmail_Text0 { padding: 10px; margin-bottom: 5px; background-color: rgb(204, 83, 83); color: #202225; } .WEmail_Text { font-size: 12px; } /** Warning Email in Profile the end **/ open templates we find; core> front> profile> profile find the line; <div class = 'ipsPad'> about 8-8 line add below; {{if $member->members_bitoptions['validating']}} <div class='WEmail_Text0 WEmail_bottom'> <div class="ipsGrid"> <div class="ipsGrid_span2 ipsType_center"> <span class='warning_Email'> <i class="fa fa-envelope-o"></i> </span> </div> <div class="ipsGrid_span10"> <p class='ipsType_reset WEmail_Text'> <strong> {$member->validatingDescription()} </strong> </p> <p class='ipsType_reset ipsType_small'>Будьте бдительны возможно это спамер!</p> </div> </div> </div> {{endif}} That's all, if you want to edit for yourself.
 1 point
 -
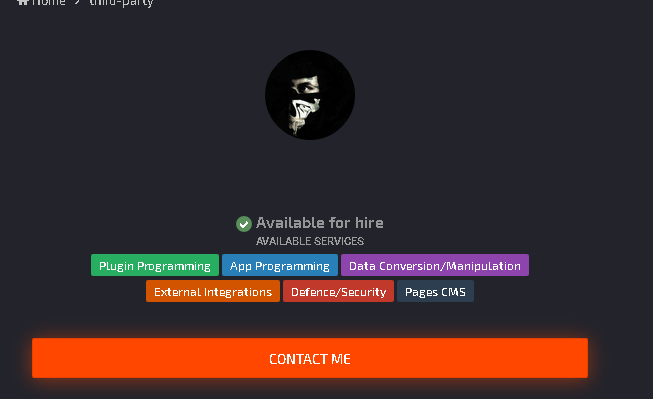
<div class="ipsAreaBackground_light ipsPad ipsType_center cProjectUserInfo" style=" z-index: 5050; top: auto;"> <a href="#link-to-ur-profile" data-ipshover="" data-ipshover-target="#link-to-ur-profile/?do=hovercard" class="ipsUserPhoto ipsUserPhoto_large" title="Go to S!r.ReaDy's profile" > <img src="Avatar-link" alt="S!r.ReaDy"> </a> <br><br> <br> <br><br> <p class="ipsType_large ipsType_reset"> <span class="ipsBadge ipsBadge_icon ipsBadge_small ipsBadge_positive"><i class="fa fa-check"></i></span> <strong class="ipsType_neutral ">Available for hire</strong> </p> <h3 class='ipsType_minorHeading'>Available Services</h3> <ul class='ipsList_inline ipsList_noSpacing'> <li> <span class='ipsBadge Skill Skill2'> Plugin Programming </span> </li> <li> <span class='ipsBadge Skill Skill3'> App Programming </span> </li> <li> <span class='ipsBadge Skill Skill4'> Data Conversion/Manipulation </span> </li> <li> <span class='ipsBadge Skill Skill5'> External Integrations </span> </li> <li> <span class='ipsBadge Skill Skill6'> Defence/Security </span> </li> <li> <span class='ipsBadge Skill Skill7'> Pages CMS </span> </li> </ul> <br><br> <a href="website-link.com/messenger/compose/?to=12" data-ipsdialog="" data-ipsdialog-title="Compose New" data-ipsdialog-remotesubmit="" data-ipsdialog-flashmessage="Message Sent." class="ipsButton ipsButton_medium ipsButton_primary ipsButton_fullWidth">Contact me</a> </div> In the custom CSS: /* Badges for skills */ .Skill { font-size: 12px; text-transform: none; font-weight: 500; line-height: 22px; height: 22px; margin-top: 4px; } .Skill1:not( .ipsBadge_neutral ) { background: #1abc9c; } .Skill2:not( .ipsBadge_neutral ) { background: #27ae60; } .Skill3:not( .ipsBadge_neutral ) { background: #2980b9; } .Skill4:not( .ipsBadge_neutral ) { background: #8e44ad; } .Skill5:not( .ipsBadge_neutral ) { background: #d35400; } .Skill6:not( .ipsBadge_neutral ) { background: #c0392b; } .Skill7:not( .ipsBadge_neutral ) { background: #2c3e50; } Result: Codes from the Invision Board itself.
1 point
-
Not exactly I just did a made an update, like this UPDATE ibf_core_members SET pp_main_photo = NULL; This solved my problem ? Thks1 point
-
I might just download his theme, apply it, and spit on my monitor.1 point
-
Version 4.1.0
188 downloads
This application will allow admins and moderators with proper permission to ban a specific user from specifics forums in his profile on Admin CP and front-end profile. Those members won't be able to: View the topic list (forum view) Read a topic from the banned forum Create topics in banned forums Topics from banned forums are excluded from Activity Streams, Search results and from user profiles.1 point


This leaderboard is set to New York/GMT-05:00