
Advertisement
Leaderboard


Popular Content
Showing content with the highest reputation on 06/05/2015 in all areas
-
Step:1 Go to ACP > Customization > Themes and Select the skin you wish to edit Step: 2 Find postContainer in the templates Step: 3 Look for <li class='cAuthorPane_photo'> {template="userPhoto" app="core" group="global" params="$comment->author(), 'large', $comment->warningRef()"} </li> Step: 4 Replace it with <li class='cAuthorPane_photo'> {template="userPhoto2" app="core" group="global" params="$comment->author(), 'variable', $comment->warningRef()"} </li> Step: 5 Create New HTML Template Name: UserPhoto2 Variables: $member, $size='small', $warningRef=NULL, $classes='', $hovercard=TRUE Location: Add To an existing location Existing Location: front Group: Add to an existing group Existing Group: global Application: System Step 6: Find HTML template "UserPhoto2" and paste the following code into it {{if $member->member_id and \IPS\Member::loggedIn()->canAccessModule( \IPS\Application\Module::get( 'core', 'members' ) )}} {{$memberURL = ( $warningRef ) ? $member->url()->setQueryString( 'wr', $warningRef ) : $member->url();}} <a href="{$memberURL}" {{if $hovercard}}data-ipsHover data-ipsHover-target="{$memberURL->setQueryString( 'do', 'hovercard' )}"{{endif}} class="ipsUserPhoto ipsUserPhoto_{$size}{{if $classes}} {$classes}{{endif}}" title="{lang="view_user_profile" sprintf="$member->name"}"> <img src='{{if $member->pp_main_photo}}{file="$member->pp_main_photo"}{{else}}{file="$member->photo"}{{endif}}' alt='{$member->name}'> </a> {{else}} <span class='ipsUserPhoto ipsUserPhoto_{$size} {{if $classes}}{$classes}{{endif}}'> <img src='{file="$member->photo"}' alt='{$member->name}'> </span> {{endif}} Step: 7 Find custom.css and Add this line of code below .ipsUserPhoto_variable img, img.ipsUserPhoto_variable, .ipsUserPhoto_variable:after { width: 170px; {{if theme.rounded_photos}} border-radius: 0px; {{endif}} } after you have completed all the steps above the results should be like this below1 point
-
hmm btw i didnt want to add this to the message cause i want others to see how to do this part as well go to customFieldsDisplay {{foreach $author->contentProfileFields() as $group => $fields}} {{foreach $fields as $field => $value}} <dl class="pairJustified"><li class='ipsResponsive_hidePhone ipsType_break'> {$value|raw} </li></dl> {{endforeach}} {{endforeach}}next add the <dt style="float:left;margin-left:30px">{title}</dt><dd style="float:right;margin-right:30px">{content}</dd>to your custom fields' Display format and it will display just as the posts and reputation above displays on the authorpane, also if by chance the title and content go on separate lines it might be that the field is too large also feel free to mess with the margin-left and margin-right on both posts, to see which one ur more comfortable with this will help u get the width apart from the title and content to one u desire or atleast comfortable with1 point
-
remove display: table-cell; from it and try it should work and yeah like that1 point
-
i believe they used IP.Content to make those pages if your ipboard license supports IP.Content you should be able to install and use the app on ur website1 point
-
Your system is trying to allocate more resources than your hosting permits. You need to increase the memory_limit in your php.ini file (or user.ini depending upon your hosting configuration) to a larger number; 128M would be sufficient.1 point
-
You go to the admin panel, go to "Search Engine Optimization" and go to the "Meta Tags" tab. Then from there you hit "Add Meta Tags" Now you can see the meta tag editor which lets you customize page titles aswell.1 point
-
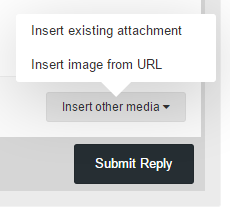
posting the link into the editor should automatically parse it also1 point
-
Insert Other Media > Insert Image From URL > Your Link URL
 1 point
 -
Version 4.0.3.58418
6 downloads
White Label Branding v4.0.3.58418 for WordPressAre you a WordPress developer or a Web Designer who uses WordPress to develop websites for your clients? Have you ever wished that it was easier to customize the menu’s and logo’s in WordPress and to decide which menu’s the users have access to? With White Label Branding for WordPress you can do exactly this. Take full control over the branding in wp-admin and decide who has access to what features. With the latest version of White Label Branding you have the ultimate tool for customizing WordPress admin and your login screen. We have added a powerful Role and Capability Manger, which will allow you to create new user Roles and assign Capabilities. You can add new capabilities for specific user Roles and you can even create a “fake” Administrator account. This can be used if you want to give your clients “admin” access, but still limit what they have access to. The real administrator will also be hidden from the users list. This way a client with the “fake” administrator account, will never know that they don’t have full access to all features. We have also added advanced color management of the entire wp-admin and you can create your own advanced login templates. When you enter a valid License Key for your copy of White Label Branding for WordPress you will get access to our Free Downloadable Content, which allows you to download custom login templates and custom color schemes for wp-admin. Demo1 point -
The question(s) in this support topic have been answered and the owner has been able to solve the problem. Because of this, the support topic has been closed and moved. If you have other questions, please open a new topic.1 point
-
Everytime i have an ipb related issue or need a plugin, i sit in my room for about 10 minutes trying to remember webflakes name. They are friendly, supportive and try to help where they can. They have had their up's and downs, but they stick through it and come out on top. They don't just give up, to me that is character. Thanks webflake, keep doing what you do!1 point
-
as davlin told you 2 months are ok for only 10$ you can find also a lot of premium things...and some extra user features.1 point
-
1 point
-
Version 2.6.3
687 downloads
[color=rgb(40,40,40)][font=helvetica, arial, sans-serif][size=2] IP.Blog enables users to create and maintain their own individual or group blogs right from within your community, to share ideas & thoughts.[/size][/font][/color] [color=rgb(40,40,40)][font=helvetica, arial, sans-serif][size=2] [b]The release of IP.Blog 2.6.3 is a maintenance release and includes bug fixes.[/b][/size][/font][/color]1 point -
-1 points
-
-1 points
-
When we pay $10, do we have the rank and the permissions forever?-1 points
-
Clearly you're taking this out of perspective.. Your definition of donation is correct, but most people find the perks as a positive side to donating, in fact, most people would only donate given those perks. Now, i ask if it's worth it because i do want to benefit even more from donating $10 to the website. You may find it selfish, which it is, but it is, what it is.-1 points
-
Version 1.0.8
1,152 downloads
This modification adds the ability for members to thank posters via Ajax. In addition, it keeps track of the number of times each member has been thanked and displays it in each post. It is very light-weight and adds no additional queries to the Topic View. It can automatically collapse the thankers if the list is too long. It can also integrate with (T30) Hide Content to show hidden content in posts simply by clicking the Thanks Button. Upon clicking the Thanks Button, the thanks will be added via Ajax and the thanks box below the post will flash three times to indicate that the post has been thanked. Finally, users can later choose to Remove Thanks if they regret clicking the button.-1 points -
-1 points


This leaderboard is set to New York/GMT-05:00