Advertisement


KELSIER
-
Posts
23 -
Joined
-
Last visited
-
Days Won
3
Content Type
Profiles
Forums
Downloads
Bugs
Roadmap
Suggestions
WebFlake Changelog
FAQ
Store
Blogs
Applications
Ideas
Everything posted by KELSIER
-
Read this post
-
Use this instead for administrators only {{if \IPS\Member::loggedIn()->isAdmin()}} Posts:= {number="$member->member_posts"} {{endif}}
-
You can do that like this Add this line to custom.css .ipsComment_highlighted:not(.ipsBox_transparent):not(.ipsModerated):not(.ipsComment_selected):not(.ipsComment_popular )[data-membergroup="x"] { background: black; border: 1px solid #fff; } The 'x' from data-membergroup="x" stands for the group id, you can copy and modify it for each group.
-
<span style="color:red; background-image: url('http://i.imgur.com/GM8QjV0.gif');"></span> Put this in Group Formatting (Members/Groups/Edit group).
-

Version 1.4.0
27 downloads
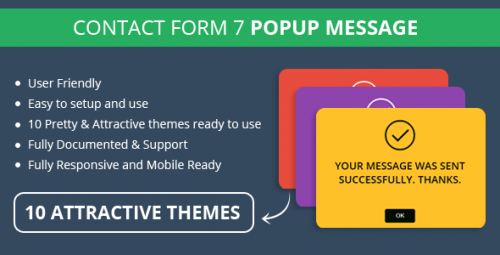
Add-on for Contact Form 7 ? The Most Simple but flexible Contact Form Popup Message Addon is an addon for contact for 7. Using this addon you can replace your validation and success messages into beautiful popup message to attract visitors. This useful add-on will allow you to select between 10 preset themes (color schemes) to instantly change the overall look of your Message. -
That depends on folder location for each user, the code above runs Counter-Strike 1.6 from the Steam Browser Protocol, wich is implemented by default in the Steam Software. Cracked version of Counter-Strike doesn't have support for it.
-
<a href="steam://connect/127.0.0.1:27015">Connect</a> More info here: Steam browser protocol
-
-
how to remove button "start new topic" from index
KELSIER replied to Comendator's question in Invision Support Archives
Delete in forums/front/index/index the following {{if \IPS\Member::loggedIn()->member_id}} <ul class='ipsToolList ipsToolList_horizontal ipsClearfix ipsPos_right'> <li class='ipsToolList_primaryAction ipsResponsive_hidePhone'> <a class="ipsButton ipsButton_medium ipsButton_important" href="{url="app=forums&module=forums&controller=forums&do=add" seoTemplate="topic_non_forum_add_button"}" data-ipsDialog data-ipsDialog-size='narrow' data-ipsDialog-title='{lang="select_forum"}'>{lang="start_new_topic"}</a> </li> {template="viewChange" group="global" app="forums" params=""} </ul> {{endif}} -
.ipsItemStatus.ipsItemStatus_large .ipsItemStatus.ipsItemStatus_read Edit text-shadow / ta_base.css
-
Delete your browser cache. Editing the .js file works, if not, you're doing something wrong.
-
Search for this ones 1. Topic list (edit text -shadow) .ipsItemStatus:not( .ipsItemStatus_large ) .ipsItemStatus.ipsItemStatus_read 2. Quote Box find (ts_base.css is you're using Behemoth) #elUserNav > li > a:not(.cShareLink) .fa, .cForumToggle:after, html[dir="ltr"] .ipsPager .ipsPager_prev a:after, html[dir="rtl"] .ipsPager .ipsPager_next a:after, html[dir="ltr"] .ipsPager .ipsPager_next a:after, html[dir="rtl"] .ipsPager .ipsPager_prev a:after, .ipsSpoiler_header.ipsSpoiler_closed [data-action='toggleSpoiler']:before, .ipsSpoiler_header.ipsSpoiler_open [data-action='toggleSpoiler']:before, [data-pagemodule="gallery"] .fa-angle-right:before, [data-pagemodule="gallery"] .fa-angle-left:before{ text-shadow: 0 0 10px {hextorgb="icontextshadow" opacity="0.50"} } replace with #elUserNav > li > a:not(.cShareLink) .fa, .cForumToggle:after, html[dir="ltr"] .ipsPager .ipsPager_prev a:after, html[dir="rtl"] .ipsPager .ipsPager_next a:after, html[dir="ltr"] .ipsPager .ipsPager_next a:after, html[dir="rtl"] .ipsPager .ipsPager_prev a:after, [data-pagemodule="gallery"] .fa-angle-right:before, [data-pagemodule="gallery"] .fa-angle-left:before{ text-shadow: 0 0 10px {hextorgb="icontextshadow" opacity="0.50"} }
-
Inside your IPS directory uploads/set_resources_* (* stands for a number)
-
Edit the ta.library.js and search for ta_c.setAttribute("style","display:inline !important") replace it with ta_c.setAttribute("style","display:none !important")
-
It's because you have 2 header blocks. You have an existing <header> block, add the menu to it. Change this <div id='ipsLayout_header'> <header id='header'> <div class='ipsLayout_container flex flex-jB'> <div class='flex01 flex11-t'>{template="logo" app="core" group="global" params=""}</div> {{if !in_array('ipsLayout_minimal', \IPS\Output::i()->bodyClasses )}}<div class='user-links user-links-sep'>{template="userBar" app="core" group="global" params=""}</div>{{endif}} </div> </header> <div class='nav-bar'> <div class='ipsLayout_container flex flex-jB flex-aS'> <div class='flex11'>{template="navBar" app="core" group="global" params=""}</div> <div class='ipsfocus-search'></div> </div> </div> </div> with this <div id='ipsLayout_header'> <header id='header'> <div class='ipsLayout_container flex flex-jB'> <div class='flex01 flex11-t'>{template="logo" app="core" group="global" params=""}</div> {{if !in_array('ipsLayout_minimal', \IPS\Output::i()->bodyClasses )}}<div class='user-links user-links-sep'>{template="userBar" app="core" group="global" params=""}</div>{{endif}} </div> <div class='nav-bar'> <div class='ipsLayout_container flex flex-jB flex-aS'> <div class='flex11'>{template="navBar" app="core" group="global" params=""}</div> <div class='ipsfocus-search'></div> </div> </div> </header> </div>
-
1. custom.css .ipsDataList_large { border: 1px solid #ffffff; } 2. Read that again. <header> Some header code like user link & stuff {template="navBar" app="core" group="global" params=""} </header>
-
1. custom.css /* Play with the colors and size */ .ipsWidget_inner { border-left: 1px solid #fff; border-right: 1px solid #fff; border-bottom: 1px solid #fff; border-radius: 2px; } 2. Search in globalTemplate for {template="navBar" app="core" group="global" params=""} And move it inside the <header></header> tags after everything else.
-
Make sure you didn't reach your server/hosting upload limits. If you have acces to php.ini tweak the following to your needs. file_uploads upload_max_filesize max_input_time max_execution_time post_max_size
-
Search for .cPost .cPost_contentWrap Usually found in forums.css and replace everything with this position: relative; border-left: 2px solid #424448; /* change the color and size */ padding: 7px 15px 15px 10px;
-
Version 3.0.0
100 downloads
Gameforest is a HTML Bootstrap Gaming Theme. Build your own gaming theme with gameforest and you will love to use it. Gameforest can be perfect if you are planning to create a Twitch, Streamer, Blogging, Video or Gaming website. Clean and pure coded HTML, CSS, SCSS, Twig files are included in your downloaded package and created by top technologies so the website building will be fun for you. Attached more than 70+ HTML pages and custom bootstrap components like buttons, progress bars, tables, widgets etc and gulp is also available for gameforest. -
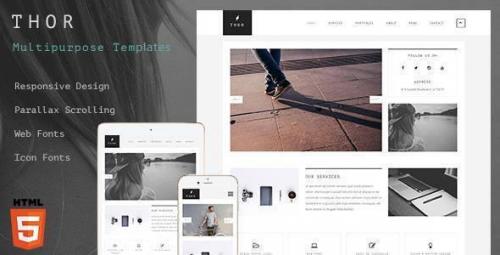
Version 1.0.0
23 downloads
Template Features: Retina & Responsive Ready 7 pages included 6 home page Parallax Scrolling Flat, Clean & Unique Design Pixel Perfect 1170 Grid System Customizable & Organized Free Google web fonts,Free Icon Fonts Fonts used in this template are: PT Mono Open Sans Font Awesome -
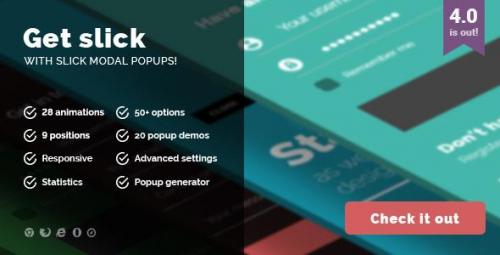
Version 4.0
77 downloads
Maximize your promotional performance with Slick Modal jQuery & CSS3 powered popup Slick Modal Popup is a great way to display your message. You can insert any code or layout inside it, let it be banners, newsletter signups, contact forms, special offer display, images, galleries, iframe, video, maps and any element more effectively and with style. Packed with over 50+ popup options and 28 transitions Slick Modal Popup comes with a wide range of avaliable options, which you can combine together and achieve eye catching effect for your messages easly and without any special coding knowledge. 50+ avaliable options 28 transitions effects 9 popup positions 20 quick start demos Popup generator Statistics plugin Responsive configuration Advanced styling options Animate the popup and your content separately Set a custom cookie for visitors Set a timed visibility delay Auto close it after X seconds Set delayed, exit or scrolled popup Hide it only on specific pages Disable it on devices with lower resolution And much more… Popup generator Modal is made for ease of use so you can quick start it in a matter of minutes. All you have to do is copy the small html block, insert your elements and define plugin options which create the look & feel of your Slick modal popup or use an included Popup generator to speed things up. Slick statistics [ᴮᵉᵗᵃ] Use Slick Stats to monitor your popup campaigns and success rate easy. Record impressions, popup views, average viewing time, CTA clicks and CTR ratio. Use it anywhere & anytime Slick Modal can be used for any purpouse – from displaying newsletter form to your favorite video. You get a basic, cluster free modal layout in which you insert your custom elements in a matter of minutes. With that you can easily display any of your elements. Most common usage of Slick modal is for: Signup forms Contact and feedback forms Newsletter signup form Popup banners and ads Images showcase Navigations and buttons Special notifications and messages Events, calendars and notes Videos and maps Any iframe, embed or object element And much more… Easy to use and customize Clean design and commented code Easy to install and set the options you need Easy to customize to fit your design and layout Lightweight and cluster free HTML5, CSS3 & jQuery powered Detailed documentation with common how to’s -
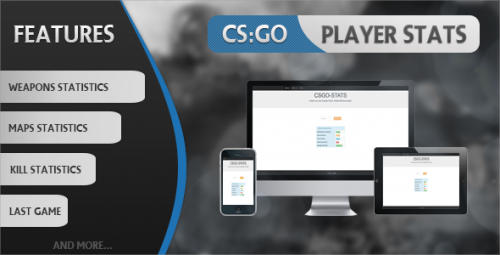
Version 1.3.1
115 downloads
Version 1.3.1 (FINAL): CS:GO Stats is a simple PHP script that reads data from Valve and then displays them in a unique and attractive design. Moreover, everything happens within 5 seconds. The script displays data about kills, weapons or maps. Requirements: PHP cURL ( for query ) Rewrite access (.htaccess)