
Advertisement
Leaderboard


Popular Content
Showing content with the highest reputation on 04/12/2019 in all areas
-
This is how to make an IPB Feature Plan. Please note that this is not a RIP of WebFlake's or IPS', this is my own version, so if you find any variations that is why. If you find any bugs, please comment them below. I will not attempt to fix them, but if someone comments a fix for a bug, I will edit it into this tutorial. Requirements: Pages Application (can be found in WF's copy of IPS 4.x).Basic Knowledge of PHP.A knowledge of the Pages application.Go into your ACP > Pages > Databases. Click Create New to create a new Database. http://i.imgur.com/5a1x5sq.pngA pop-up will appear. Make sure you are on the Create New Database and click Next.Make the name of your Database whatever you'd like, I suggest Feature Plan.Make the settings exactly as shown in the picture. http://i.imgur.com/sVFJp6O.png. It's very important to have your Use categories settings set to No.Once you've created your database head over to the Templates section. ACP > Pages > Templates (http://i.imgur.com/kDmY5SH.png) Read carefully from here on because it can be a little tricky if you miss a step.Once you are inside the Templates section click New > Add database template. Here's where you have to be careful and follow my instructions exactly.You will get a pop-up presenting you with a few options. Fill in the options exactly as show in the picture. http://i.imgur.com/b3WOsiU.pngUnder the HTML tab you should see a new folder called Plan with 5 different templates under it.Paste the code provided below in the appropriate template.recordRow: http://pastebin.com/M3GxdMtkfilterMessage: http://pastebin.com/2zjxQ6B2categoryTable: http://pastebin.com/ZF63gtrQcategoryHeader: http://pastebin.com/rSpLb2CxcategoryFooter: http://pastebin.com/UeJtv1T6Inside the categoryHeader template you should see some non-code text. You can edit that code to change the Title and Subtitle at the top of your Feature Plan.Inside of the recordRow template search for{{if $row->fieldValues()['field_19']Keep that tab open and open a new tab inside of Pages in the ACP. http://i.imgur.com/pPMVVxs.png Click in the fields section of the Feature Plan database. You should see the Status section. Click on the pencil to edit the database. Open notepad or some other text editor. Paste in the URL of the page you just opened. At the end you should see something like do=form&id=19. You need the number at the end of the URL. Mine happens to be 19. Yours might be 125 or it might be 4. Move back to the tab you have open where you located {{if $row->fieldValues()['field_19']inside of the recordRow template. Change field_19 to field_YOURNUMBERHERE. Obviously filling in YOURNUMBERHERE with the number at the end of the URL you copied into a text editor.Inside the ACP go to Pages > Pages. http://i.imgur.com/DRvnNXI.pngClick New Page and choose Page Builder for the Content Editor option. Click next.Make the pages name what you choose. I recommend simply Feature Plan. Go to the menu tab at the top and click add to menu. Leave those settings as is and click save.Navigate to the index page of your forums. The homepage. Click on Feature Plan in the navigation bar. Or whatever you named it.In the left you should see a little arrow peaking out. Click it.Click the arrow on Pages and drag the Database option onto the page wherever you'd like.Click the edit button on the Database module and choose the Feature Plan database.Click finish editing.Go to the Fields area of the Feature Plan database. Make a field called Summary. Make your settings exactly like this > http://gyazo.com/6143d472c4d98d8f1081549904f86449 and http://gyazo.com/7ea23135b68960bcfa498cb44ca03949Make another field called Status. Settings like this > http://gyazo.com/911306ba613c285c5af2ef423e7eb00c and http://gyazo.com/62d10796a176d03a36a2ba4ff42b023c{{if intval( $formValue ) === 1}} <span class='c4StatusBadge c4StatusBadge_upNext'>{$value}</span> {{elseif intval( $formValue ) === 2}} <span class='c4StatusBadge c4StatusBadge_comingSoon'>{$value}</span> {{elseif intval( $formValue ) === 3}} <span class='c4StatusBadge c4StatusBadge_future'>{$value}</span> {{elseif intval( $formValue ) === 4}} <span class='c4StatusBadge c4StatusBadge_done'>{$value}</span> {{endif}}Also this: http://gyazo.com/f309c9cc35833a70ff37dcbd4d397d6f So there you go. That's my interpretation of the Feature Plan. I hope you enjoyed this tutorial and it helped you. If I helped you out or you have a question, please drop a comment below. @unlucky4ever A special thank you for figuring out the reputation code. TO FIX THE ERROR WITH DISPLAYING STATUSES In Feature Plan > Fields, Navigate to Status > Edit > Display Options and Change the Template Key from status to status2. Thanks to @otecko for this fix.1 point
-

Version 4.3.6
13,359 downloads
IPS Community Suite 4.3.6 Released 9/20/2018 WebFlake Note: Please create a support topic if you need assistance. As always, we recommend that you backup your current installation (database included) before upgrading.1 point -
Version 1.0.1
1,113 downloads
This plugin (widget) will join the statistics of members and forums into one. Requirement: FORUMS app.1 point -
Version 1.0.1
137 downloads
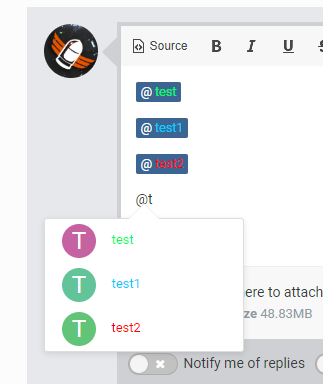
The plugin formats the user name in the mention.1 point -
Version 1.0.0
162 downloads
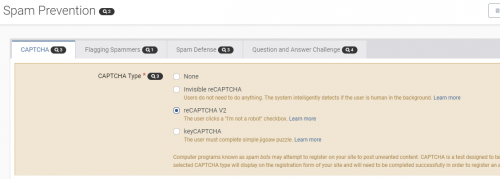
This plugin add the captcha on login form1 point -
1st. You would have to change the date via phpmyadmin - but be careful as you could stuff up the whole system. 2nd. You want to change the icon without actually adding an image? How else do you expect to do this?1 point
-
Welcome Nikola, hope you enjoy your stay!1 point
-
The question(s) in this support topic have been answered and the topic author has resolved their issue. This topic is now closed. If you have other questions, please open a new topic.1 point
-
Version 2.0.1
229 downloads
This plugin allows ONLY administrators to see the posters IP in topic view regardless of any other setting. This is especially useful for forums that must comply with laws that allow only the administrators and nobody else to see the IPs for privacy related issues (like in Italy).1 point -
try this might help </body> tag and insert the following code: <script> var link = document.getElementById('lkCopyright'); link.style.display = 'none'; link.style.visibility = 'hidden'; </script> i am updating this topic which i have posted the answer for you that works 100% i tested on my site and it gone1 point
-
Version 1.0.2
19 downloads
This plugin will change the "UPPERCASE TOPIC TITLE" to "Lowercase topic title": it will transform all uppercase letters into lowercase letters and will capitalize the first letter of the topic title. Settings: Type of topic title: first letter uppercase or first letter of each word uppercase Reserved word: Those words will remain in UPPERCASE Note: Made to work and tested only in English and Brazilian Portuguese. Latest CONFIRMED working IPS version is 4.3.6 but the plugin is really simple, should be fine across all 4.x What's New in Version 1.0.2 Fixed errors on special characters1 point -
thanks so much in advance, this is the only site where i found it .1 point
-
Version 1.0.11
46 downloads
Small Widget to show a list of online users on a Rocket.Chat server. Intended to be used along with the OAuth Server application that allows to login in a Rocket.Chat server using the forum credentials. Instructions: download the .tar file upload into the Applications in your AdminCP use the block edit mode to add the new widget, use the edit button to add the rocket.chat server url (no / at the end!) and a user that can access the RESPT API The Widget was tested on Rocket.Chat: 0.56.0 IPB: 4.1.19.4 PHP: 7.0.18 (should work with older versions as well, no fancy stuff used) OAuth2: 1.2.4 The rocket.chat username in this scenario will match the member name in the forum, so some nice profile links are possible. Currently no caching is setup for the widget (if you have a bigger forum this will matter) - have not yet figured out how to configure the widget cache1 point -
85 downloads
[list] [*]Full Screen Image Background [*]Full Screen YouTube Video Background [*]3 Additional Content Pages [*]3 Columns [*]jQuery Countdown [*]Animated Content Changer with Smooth Transition Effect [*]Real Time Live Twitter Feed [Twitter API v1.1 Compatible] [*]Contact Form with Validation [Without Page Refresh] [*]Newsletter Subscription Form with Validation [Without Page Refresh] [*]Responsive Layout [*]Social Media Profiles Support [*]jQuery Animation Effects [*]Styled Typography [*]Valid HTML5 [*]Multi-Browser Support [/list]1 point
.thumb.png.267184132e48b991c16493df416343ce.png)


.png.96bfd817b2c8daf0a6ac45e727ae1783.png.2eb2b2dfd8df7b16ee79e15b6ebf7379.thumb.png.54049a94414e453462e3a7f31ee14519.png)


This leaderboard is set to New York/GMT-05:00