
Advertisement
Leaderboard


Popular Content
Showing content with the highest reputation on 08/22/2016 in all areas
-

Version 1.0.0
146 downloads
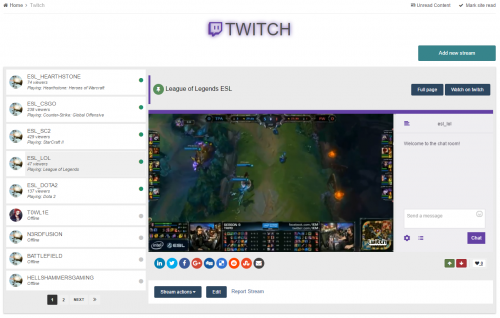
Don't be a leech, click the reputation button if you want to get more files in the future. This is not a custom plugin or an application, This is a custom database by Pages app created and customized for twitch system. This is also the recreation and upgraded version of Guide: Creating twitch Channels using pages What is the different? check features Features : Twitch status, Online/Offline, Viewers, game name. Optionally allowing channel chat, side by side with stream video Auto sorting channels by online status. Custom block template customized to show one recent stream with user status on block title. Responsive design and using IPS css classes which will perfectly suite any theme you're using. Installation STEP 1 - installing the database zip file contains 4 files Twitch.xml - This is the main database file, Go to ACP > Pages > Database > Create New > Upload Database > and upload theTwitch.xml After you install the database go to ACP-> Pages > Database > Twitch > Edit > Database Key > Name the database key to TwitchDB and Save. You will also need to set permissions for custom database fields at ACP > Pages > Twitch > Fields > Then set whatever permission you want for each field. CSS.txt - This text file contains the css used for this database, Copy the codes and then Go to, ACP > Pages > Templates > New-> Add CSS File > name it Twitch and Save. from the same page click on CSS tab open the twitch file you created and paste the codes JS.txt - This text file contains the JavaScript used for this database, Copy the codes and then Got to, ACP > Pages > Templates > New > Add Javascript File > name it Twitch and Save. from the same page click on JS tab open the twitch file you created and paste the codes. Twitch-Block.xml - This is an optional Block template you can use it to show the recent twitch channels, to install this block template go to ACP-> Pages-> Templates > Upload Template. once you upload the template go to ACP > Blocks > Create New Block > Feed from Twitch > Next > Content > Template > selectTwitch_Block template and save the block. You may also want to make the block to show only one record. STEP 2 - creating a page for the database Go to ACP > Pages > Pages > Add Page > Content Editor > Manual HTML > Next >... 1. Click on Page Includes tab and select the twitch javascript and the css you created on step 1 2. Click on Content tab and select Twitch database tag from right side of page, If you have already named the database key to TwitchDB just paste the following tag in Content tab {database="TwitchDB"} That's all for the installation check DEMO on our website2 points -
Version 2.2.2
97 downloads
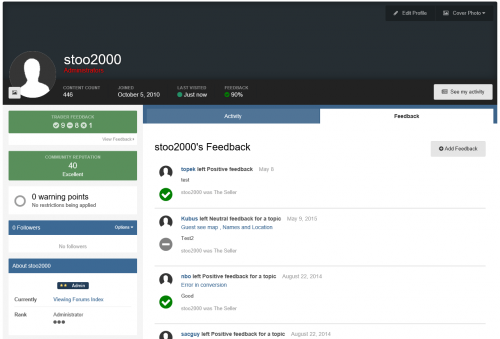
Members can leave positive, negative, or neutral feedback Integrates feedback information in member profiles Restrict access and features based on user group Source code is completely un-encoded One-click install. No file edits required. Captcha on Feedback Submission Flood Control on Feedback Submission2 points -
Version 1.0.0
38 downloads
This plugin will display, on category view, the list of downloaders of files. Requeriments: Downloads1 point -
Version 1.03
57 downloads
Don't be a leech, click the reputation button if you want to get more files in the future. This plugin will enable/check the checkbox NOTIFY ME OF REPLIES on new topic/reply form, regardless the 'Automatically follow content' notification setting of the user. Setting: Groups that will have the checkbox enabled NOTE: If you got the error 1S111/1 mkdir(): No such file or directory when installing this plugin, simply uninstall it and reinstall it. It will work just fine.1 point -
We have a discord server now. Now you can talk to fellow WebFlake members in a more convenient way. Click the image above to join it. You have to be registered with Discord to talk on our server. If you don't have discord installed on your PC or Mac, download it here: https://discordapp.com/apps Discord is also available for iOS or Android devices. =================================================================================== While talk can get technical, our discord server is generally not for support purposes. If you have a website issue, please use the appropriate forum for it.1 point
-
Version 1.0.0
222 downloads
hey Adriano Faria 凸( ͡° ͜ʖ ͡°)凸 This application will allow your community to use an invitation system for new registrations. You can make it mandatory (or not, depending on your configuration). In this case, an invitantion code will be required in order to register a new account in your community. Public side features: Users can send invitation in 2 places: + Create menu and Invitations on Account Settings. New icon on board top (beside Notifications and Messenger) to display the converted invitees and how many invites the user has. This icon also shows the remaining invitations for the member (just like how many users are online on Chat). 2 widgets: Top Inviters (per week, month, year and general) and Latest Converted Invitees, which are invitations converted to membership. Shows "Invited by" on user profile and on profile card (hover on user link). Tab on user profile to display their invitees (converted invitations) Settings: Enable Invite System Require an Invitation to Register an Account Restore deleted or expired invitation Display "Invitation" option on + Create menu Display the popup Invitations link on board top? Display total of remaining invitations Invitation Expires after X days Earn one Invitation at every X new content posted ACP Features: Invitations Management: a place where you can see the status of each invitation. The status are: PENDING, CONVERTED and EXPIRED. You can invite people, delete or resend invitations. You can also create batch invitations, to be used on a campaign or to be posted elsewhere. It won't send any emails. Bonus form: you can give invitations to a specific member or to a whole member group Note: Due to the rework on this app (every new resource has to be done from the scratch to run on IPS4 and it was a hook on 3.4), a new purchase is required. Thank you for your understanding. What's New in Version 2.0.11 See changelog Released July 16 New feature: Added new setting to give invitations when a new member creates the account Added a button on Invitation (ACP) to delete all expired invitations Fixes: Fix the number of invitations on Batch Invitation feature Limit to latest 10 converted invitation on board top icon. All converted invitation can be accessed via Account Settings.1 point -
Version 1.0.5.1
375 downloads
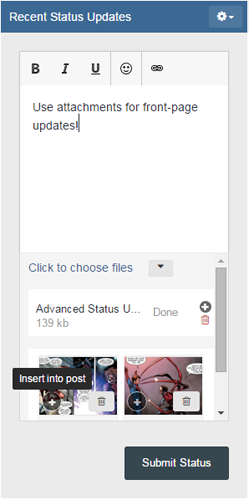
An all-in-one Status Updates widget block, loaded with features, all available on the front page of your IPB! Easy to install, supported by IPS 4.1x, and includes essential enhancements to the stock Status Updates system. - Features: Toggle between Rich Text and Plain Text. Extended tool-list includes Reputation and other options. Front page attachments support. View or add replies. Choose whose Status updates to view. View older Status updates. Edit option for both Status updates and replies. Live-updates for both status and comment feeds. (currently unavailable) - Demo 1.0: - Note to members who purchased the plugin prior to 1/7/16: This is NOT the same Status Feed Upgrades plugin that was featured on this page, so make sure to uninstall it before installing the Advanced Status Updates plugin. Also, do not upgrade from Status Feed Upgrades to Advanced Status Updates. The main reason the previous plugin has been replaced with this one is due to conflicts between templates and hooks over the stock widget block. This plugin was made as a completely separate block, so as to minimize that risk. - Widget Settings: All widget settings are available through the widget settings block, under the block manager view. The default widget settings (except for the widget title) are available through the plugin setting's "Default Settings" tab. Widget title - The title of the widget block. Defaults to "Recent Status Updates". Number per page - How many status updates should be loaded per page? Load older updates? - Allow loading more than a single page of status updates? Display upload area? - Determines whether or not to display the upload area for Status Updates on the front page. Status height limit - The number of lines to limit the status height to. Status types included - Determines the types of status updates to display - status updates, profile posts, or both. Rich text format? - Determines whether a status should be loaded as rich text by default, or not. Display profile photos? - If enabled, profile photos will appear next to updates by default. - Plugin Settings: Plugin settings are available through the acp > plugins view. Override default widget? - Enable to display Advanced Status Updates widget instead of the built-in one. Search filter available? - Enable to allow by-member filter option. For support or suggestions don't hesitate to use the dedicated support thread. No comment goes unnoticed.1 point -
1 point


.thumb.png.267184132e48b991c16493df416343ce.png)
This leaderboard is set to New York/GMT-05:00