
Advertisement
Leaderboard


Popular Content
Showing content with the highest reputation on 06/06/2016 in all areas
-
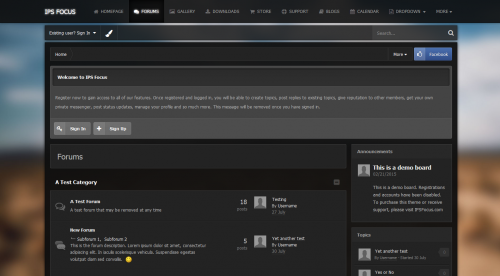
Hi, Earlier i saw some people was asking how AltisLife created their Server Statistic at the top of their website. This guide will help you make exactly the same. Go to Admin CP -> Customization -> Themes -> Your Theme -> Edit HTML and CSS -> CSS -> custom.css and open the css file. Paste the following CSS code onto the custom.css: .infoTab { float: left; line-height: 42px; font-family: 'Montserrat', sans-serif; font-size: 130%; padding-left: 75px; } .msg { float:right; line-height:42px; font-family:'Montserrat', sans-serif; font-size:140%; } .serverBar li { padding-left:10px; } .playerCount { color:#536e41; } .msgText { margin-right:15px; } .serverOnline { color:#536e41; } .serverOffline { color:#972E33; } Go to Templates -> core -> front -> global -> globalTemplate and open it. Paste the following HTML code into the globalTemplate: <div class="ipsLayout_container ipsClearfix" style="margin-bottom: 4px;"> <div id="navBar" class="ipsClearfix"> <ul style="font-size: 1.4rem;" class="infoTab ipsList_inline cSignedIn ipsClearfix ipsResponsive_showDesktop serverBar"> <li class="serverName" data-ipstooltip="" data-ipstooltip-label="Tooltiphere">TEAMSPEAK</li> {block="ts_slot_check"} <li class="serverName" data-ipstooltip="" data-ipstooltip-label="Tooltiphere">SOME</li> <li class="playerCount" data-ipstooltip="" data-ipstooltip-label="Tooltiphere"><span id="server_0" class="serverOnline">ONLINE</span></li> <li class="serverName" data-ipstooltip="" data-ipstooltip-label="Tooltiphere">CONTENT</li> <li class="playerCount" data-ipstooltip="" data-ipstooltip-label="Tooltiphere"><span id="server_1" class="serverOnline">ONLINE</span></li> <li class="serverName" data-ipstooltip="" data-ipstooltip-label="Tooltiphere">HERE</li> <li class="playerCount" data-ipstooltip="" data-ipstooltip-label="Tooltiphere"><span id="server_3" class="serverOnline">ONLINE</span></li> <li style="font-size: 1.4rem;" class="msg" data-ipstooltip="" data-ipstooltip-label="Tooltiphere">Your Website Name</li> </ul> </div> </div> Now you need to create a php block that can display real time server status. In this example i will show you how to do it with the Teamspeak, for others you have to write your own script or get one from internet. Go to Pages -> Block -> Create New Block -> Custom -> Manual PHP -> Next Name: Anything you want Template Key: ts_slot_check Content: require_once("misc/libraries/TeamSpeak3/TeamSpeak3.php"); try {$ts3 = TeamSpeak3::factory("serverquery://SERVERQUERYUSERNAMEHERE:SERVERQUERYPASSWORDHERE@SERVERIPORDNSHERE:10011/?server_port=9987"); echo "<li class='playerCount' data-ipstooltip='' data-ipstooltip-label='Tooltiphere'><span id='server_2' class='serverOnline'>" . $ts3->virtualserver_clientsonline . " / " . $ts3->virtualserver_maxclients . "</span></li>";} catch(Exception $e){echo "<li class='playerCount' data-ipstooltip='' data-ipstooltip-label='Tooltiphere'><span id='server_2' class='serverOffline'>OFFLINE</span></li>";} And now you just have to download PlanetTeamSpeak Framework from HERE Then copy the libraries folder and all of its content to your webserver /misc/ folder. It should looks like /misc/libraries/TeamSpeak3/TeamSpeak3.php The script is working now, and your website will display the user number on your teamspeak. Please note that this guide is only makes possible to display Teamspeak status. The other 3 column is just a static content that you can make dynamic with a script. Enjoy1 point
-

Version 2.0.4
646 downloads
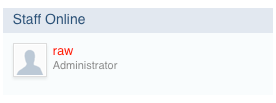
Don't be a leech, click the reputation button if you want to get more files in the future. Adds online users from staff usergroup(s) of your choosing to the sidebar.1 point -
Version 1.0.0
141 downloads
Don't be a leech, click the reputation button if you want to get more files in the future. This plugin will allow you to clear the cache without having to use the support tool.1 point -
Version 1.0.0
256 downloads
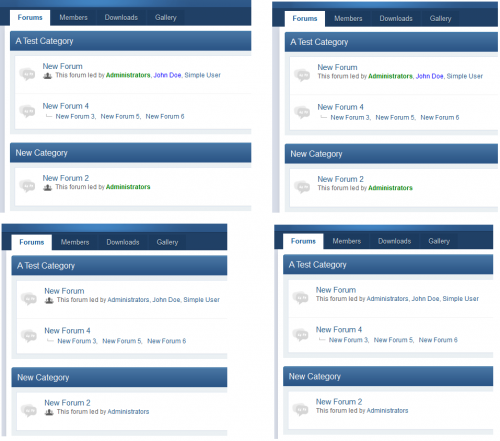
Don't be a leech, click the reputation button if you want to get more files in the future. This is my very first plugin and shows member number & join date and adds titles to each in the AuthorPane area of post NOTE: If upgrading from to newer version then please delete the old version and then install new version (do not use upload the new version option as may cause problems) There is a 'short' and 'long' version (both .xml files) Short version removes the 'pips' and name above the member photo and the 'long' keeps those in (see screenies) Template and .css file imported with plugin and changes can be made to either Please read the custom_fields_instructions.txt so you know what to add to your custom fields to make look same Change from this (the original default view): to either this (short): or this (long): screenshot v1.0.3 (more details) What's New in Version 1.0.3 Added more details (online/offline, last visited and if online where the member is)1 point -
Version 1.0.2
132 downloads
Don't be a leech, click the reputation button if you want to get more files in the future. This plugin allows assigning customized and personal group names for your members! Rewarding or distinguishing members, using their group name, shouldn't immediately imply creating a new member group. Instead, using this plugin, you can simply edit a member's group name directly from the ACP. *The titles are formatted the same as the member's group, only the text will read differently. After setup, a new field will appear under the 'Profile' tab, in the member editing area of the ACP: Left: before / Right: after What's New in Version 1.0.2 Hooks updated. Added hook to search results template. Support for Custom Group Format plugin.1 point -
Version 1.0.10
303 downloads
Don't be a leech, click the reputation button if you want to get more files in the future. Wanting to be able to display a country flag that your members choose from a dropdown? This plugin allow for a simple Country profile field. It can be displayed in Display Format so it will show up next to your posts. Also Pages compatible. Note: This will not upgrade any custom Country field already existing, it's a brand-new plugin. To add as a profile field: Go to Admin CP > Members > Member Settings - Profile and click to add a profile field. You should see it in the Field Type dropdown as Country (CVH). To display in posts: Go to Admin CP > Members > Member Settings - Profile and click to edit your profile field. Go to Search & Display Options - Display Format in the form. Put <strong>{title}:</strong> {content} Do not replace the variables with something else though you can tweak the HTML. What's New in Version 1.0.10 If you use Pages this fixes a major bug with select fields. Bugfix for geolocation for expired licenses.1 point -
Version 6.1.0
1,041 downloads
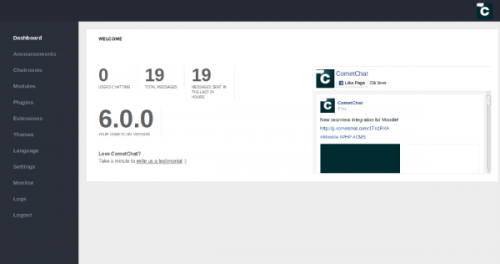
CometChat – that can be integrated into your website. This chat enhances interactivity, allowing users to chat with friends and other Internet users. CometChat uses standard PHP and MySQL to communicate. No additional modules on the server side is not required. CometChat can be used to create online support on the site, as well as a regular chat for all users.1 point -
Hello WebFlakians, Due to an unforseen firewall issue and a policy inside of it that was set a little too strict, cloudflare has had some server nodes not being able to communicate with our server. This was particularly hard to fix due to myself and some other people still being able to access the website while users from different regions (who connect to different cloudflare nodes) could not connect to WebFlake. This has lead to a long time undetected issue resulting in way less activity and visitors from some countries. I'm pleased to announce that this bug is finally fixed and won't bother us anymore. Kind regards, WebFlake Team1 point
-
edit: nice release mate keep up the good work.1 point
-
Version 1.0.9
1,289 downloads
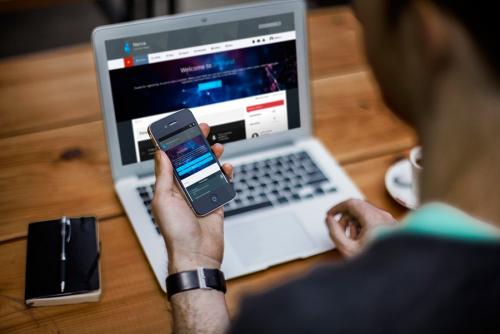
About This File Very clean a skin with advanced features designed for the IPS 4.x. Fully customizable with features you can create a website that you want. Nerva with advanced features designed for the IPS 4.x is a clean skin. Nerva was rebuilt with skin v1.0.1 release. We attach great importance to the fact that we produce the skin at the same time user-friendly. Product Details1 point -
Hello Alex, welcome to WebFlake! I hope you do decide to stay with us, looking forward to see your work or content posted around to help contribute our growing community.1 point
-
Version 1.0.0
323 downloads
I dont have any screen shots but heres a link to the original paid download. https://community.invisionpower.com/files/file/7758-vectron-ips41-theme-hq/ I just purchased this moments ago. Enjoy.1 point -
Version 1.0.0
597 downloads
Villain is a dark, semi-transparent dark skin which includes a simple background picker allowing your members to choose their own image from a preset array of high quality background images. Perfect for any community, and especially great for gaming forums or site who want to offer customization options to their members! "Settings" Template File This skin includes a settings file allowing you to easily enable or disable features within the skin. This makes modifications and upgrades very simple since little code changes are required. Background picker Your members can choose their own background image from a predefined selection and their choice is saved via cookies. This feature can be disabled using the Settings file. Fixed header The top bar stays at the top of the site at all times, providing easy navigation. This can be disabled in the settings file if needed. Guest message A customizable message is shown to guests, prompting them to either register or login to your forum. Social links Social links can be enabled/disabled and customized to your own URL using the Settings file, allowing you to easily link to your social network pages (facebook, twitter, etc) Tooltips Forum descriptions are placed inside animated tooltips (can be disabled using the Settings file if needed), resulting in a cleaner layout. HTML text as logo Changing the logo text is extremely easy by modifying the HTML text. If required, the text can be replaced by an image instead. Individual forum icons If enabled, you can customize the icons for each forum, allowing for easier identification. Easy to add your own, with instructions provided once purchased. Grey-scale "no new" icons Forum icons are converted to grey-scale using css filters in webkit browsers (Safari & Webkit) if there are no new posts in that forum. Other browsers simply reduce the icons opacity.1 point -
Version 1.0.0
75 downloads
Professional leather Georgie for IPS.On has the following characteristics: - Cross-browser compatibility - Your style will not be able to steal (the method of writing the cascading style sheets in the template itself. What is not so easy to hackers!) - Flexible slider - Text logo - Simplify design To change your slider to go ADC - Settings - threads => Templates => kernel => contentslider. To change the logo, to go to the ADC - Settings - threads => Templates => General => Logos1 point


This leaderboard is set to New York/GMT-05:00