
Advertisement
Leaderboard


Popular Content
Showing content with the highest reputation on 05/18/2016 in all areas
-

Version 1.0.2
154 downloads
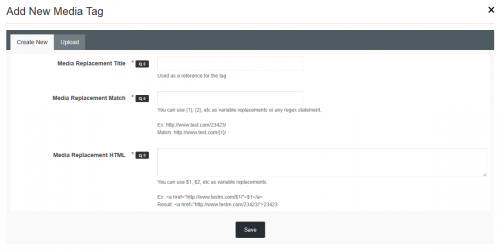
About This FileRestore a feature from IP.Board 3 that allows users to define their own media tags. 1. If oembed is supported, please add custom oembed services. 2. If oembed is not supported, you can add you own media tag to replace the url to the format you would like. 3. Members without HTML Post permission will fail to save the content, as HTMLPurifier will clean all illeagal HTML contents. As a matter of this, you will have to define allowedIFrameBases, and also have to use iframe in media tag replacement. For example(alreadly supported by IPS), Youtube supports oembed, so you can add it to oembed services as below URL Scheme: youtube.com API Endpoint: https://www.youtube.com/oembed And as returned html by youtube oembed is like <iframe src="https://www.youtube.com/embed/..." ...>You also have to add "www.youtube.com/embed/" to allowedIFrameBases. What's New in Version 1.0.2 Released 20 June Can define what type(video, photo, rich) the media tag is; Added supports for OEmbed supports; Ability to configure Allowed IFrame Bases;1 point -
Version 2.0.0
244 downloads
Logs information about all logins performed on your site, whether they are successful or not. The following information is logged: Time of attempt, Member account Username/Email used, IP Address Attempt number Result It should be noted that there is the potential for massive amounts of data to be stored with this application on busy sites, so I recommend you use the LOG PRUNING setting to prune old logs daily. Upgrade from version 1.1.0 (IP.Board 3.X): Simply perform a FRESH INSTALL of version 2.0.0 and the installer will insert the logs from the old app into the new and will delete all data from old app.1 point -
Version 1.0.1
357 downloads
Hook displayed the members' reputation points in the menubar next to notifications icon.1 point -
Version 1.0.2
21 downloads
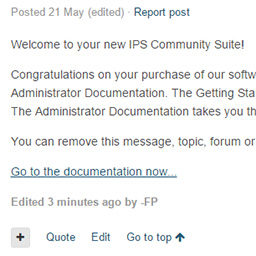
Don't be a leech, click the reputation button if you want to get more files in the future. This plugin places a "Go To Top" button in the posts controls both for forum posts and private messages. Translate the language string "goToTop" if you want to modify the Font Awesome icon. Compatible with Community Suite 4.1.7.1 point -
Version 1.0.3
163 downloads
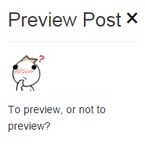
Don't be a leech, click the reputation button if you want to get more files in the future. This little plugin adds a 'Preview Post' button to the form area. As community owners and staff, some of you may have come across situations where members of your community have asked for the ability to view their posts outside of the editor, at different sizes, with the BBCode parsed, and under the same CSS classes and templates as actual posts. The Preview Post button does exactly that, when the editor contents are loaded via JS onto a popup dialog and into a predesignated preview template (which by default is set to be the same as the content area of posts). What's New in Version 1.0.3 Bug Fixes: Fixed issue with button not appearing when editing posts. New Features: Button design setting has been added. Accurate BBCode setting has been added. Button has been moved to a separate template. Language string for dialog title has been added.1 point -
Works as intended. Thanks for sharing!1 point
-
Hello, and welcome to WebFlake!1 point
-
Was accepted to MIT. My flight is Tuesday. Can't wait to start my college experiences at one of the most prestigious schools in the world.1 point
-
1 point
-
1 point
-
1,160 downloads
[size=4][color=#282828][font=helvetica]With this application you can setup a MotM (member of the month)[/font][/color][/size] [size=4][color=#282828][font=helvetica]on your board.[/font][/color][/size] [b]ACP Features[/b][color=#282828][font=helvetica][size=3]:[/size][/font][/color][list] [*]Admin can set up Application on/off. [*]Admin can set up which groups can view MotM. [*]Admin can enable/disable Motm block in home page [*]Admin can enable/disable Icon in the maintitle of the block [*]Admin can choice avatar size to show in home page [i](mini, medium, large)[/i] [*]Admin can enable/disable Motm Archive Page [i](with historical data)[/i] [*]Admin can setup how many records to show in the archive page [*]Admin can setup block postion [i](sidebar, top, bottom) [/i] [*]Feature: (Pin) Awards support [*]Feature: (Pin) Awards - show icons on block or Awards Total [*]Feature: (Pin) Awards - Limit icons display number [*][b]Feature: [url="http://community.invisionpower.com/files/file/5966-hq-awards/"][HQ] Awards[/url] support [/b] [*][b]Feature: [url="http://community.invisionpower.com/files/file/5966-hq-awards/"][HQ] Awards[/url]- show icons on block or Awards Total [/b] [*][b]Feature: [url="http://community.invisionpower.com/files/file/5966-hq-awards/"][HQ] Awards[/url] - Limit icons display number [/b] [*][i]Block Preview in admin ACP[/i] [*]Popup modal window for Staff Note [*]Settings to configure a signature and title for motm note [*]Auto-Select Motm by reputation received in the last month[i] [/i] [*]Motm suggestions in ACP[i] [/i] [*]ACP overview restyled [/list][b]Block Features[/b][list] [*]12 stats displayed for member of the month [/list][b]Compatibility[/b][color=#282828][font=helvetica][size=3]:[/size][/font][/color][list] [*]IP.Board 3.4.X [size=2]([i]tested on beta[/i])[/size] [*]IP.Board 3.3.X [*]IP.Board 3.2.X [/list] What's New in Version 1.5.0 [list] [*]Feature: added notification for motm [*]Feature: added furl support [/list]1 point -
Works like a charm! Thanks :D0 points
-
Version 1.0.0
146 downloads
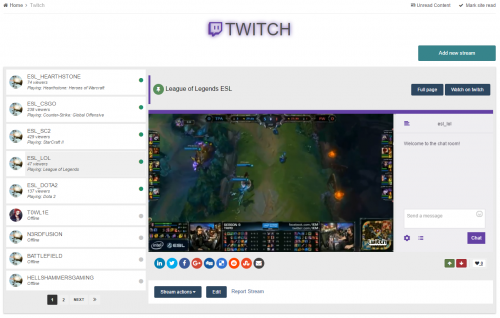
Don't be a leech, click the reputation button if you want to get more files in the future. This is not a custom plugin or an application, This is a custom database by Pages app created and customized for twitch system. This is also the recreation and upgraded version of Guide: Creating twitch Channels using pages What is the different? check features Features : Twitch status, Online/Offline, Viewers, game name. Optionally allowing channel chat, side by side with stream video Auto sorting channels by online status. Custom block template customized to show one recent stream with user status on block title. Responsive design and using IPS css classes which will perfectly suite any theme you're using. Installation STEP 1 - installing the database zip file contains 4 files Twitch.xml - This is the main database file, Go to ACP > Pages > Database > Create New > Upload Database > and upload theTwitch.xml After you install the database go to ACP-> Pages > Database > Twitch > Edit > Database Key > Name the database key to TwitchDB and Save. You will also need to set permissions for custom database fields at ACP > Pages > Twitch > Fields > Then set whatever permission you want for each field. CSS.txt - This text file contains the css used for this database, Copy the codes and then Go to, ACP > Pages > Templates > New-> Add CSS File > name it Twitch and Save. from the same page click on CSS tab open the twitch file you created and paste the codes JS.txt - This text file contains the JavaScript used for this database, Copy the codes and then Got to, ACP > Pages > Templates > New > Add Javascript File > name it Twitch and Save. from the same page click on JS tab open the twitch file you created and paste the codes. Twitch-Block.xml - This is an optional Block template you can use it to show the recent twitch channels, to install this block template go to ACP-> Pages-> Templates > Upload Template. once you upload the template go to ACP > Blocks > Create New Block > Feed from Twitch > Next > Content > Template > selectTwitch_Block template and save the block. You may also want to make the block to show only one record. STEP 2 - creating a page for the database Go to ACP > Pages > Pages > Add Page > Content Editor > Manual HTML > Next >... 1. Click on Page Includes tab and select the twitch javascript and the css you created on step 1 2. Click on Content tab and select Twitch database tag from right side of page, If you have already named the database key to TwitchDB just paste the following tag in Content tab {database="TwitchDB"} That's all for the installation check DEMO on our website-1 points


This leaderboard is set to New York/GMT-05:00